The RDHPCS Cloud Platform allows NOAA users to create a custom HPC
cluster on an as-needed basis. NOAA Cloud Computing uses the Parallel Works computing platform to
manage cloud computing resources across Amazon Web Services
(AWS), Google Compute Platform (GCP), and Microsoft Azure Cloud
Computing Services (Azure) via the NOAA RDHPCS Portal, customized for NOAA.
Note
The Parallel Works platform can also be used to manage resources in on-premise
systems. Operation is identical for Cloud and on-premise environments.
The RDHPCS reminds all users who perform transfers out of the Cloud
using a Globus endpoint that all egress charges will be applied to the project.
This includes data stored in a CSP public, free to access repositories, like
the NOAA Open Data Dissemination (NODD) program.
NOAA users will find minor differences, for example, the login
authentication, and project allocation between the standard and customized
applications.
You can use Parallel Works to access Cloud clusters (assuming you have a
project allocation on the Cloud platform) or on-prem systems. See
Request access to RDHPCS projects if you need access to a Cloud project.
The Parallel Works ACTIVATE platform provides standard scripts, called
workflows, to complete tasks on the platform.
If you’re running a workflow for the first time, you will
need to add it to your account first. From the PW main page,
click the workflow Marketplace button in the sidebar menu:
From the Marketplace home page you can review available
workflows.
Using Parallel Works to access on-prem HPC Systems
Parallel Works supports authentication with on-prem HPC
systems. The ACTIVATE platform works identically on
Cloud and on-premise systems.
Subscribe to the default template of HPC systems from the Parallel
Works Marketplace
From the login portal, click on the user Name. Select
MARKETPLACE from the drop down list box.
Click on the Fork sign and click the Fork button when prompted.
Exit the page.
Attention
Access is allowed from the following countries
USA, India, Mexico, China, Canada, Taiwan, Ethiopia, France, Chile,
Greece, United Kingdom, Korea, Spain, Brazil, Malaysia, Colombia,
Finland, Lebanon, Denmark, Palestinian Territory Occupied,
Netherlands, Japan, and Estonia.
Access the head node from within Parallel Works [PW]
You can connect to the head node from the PW portal, or
Xterm window if you have added your public key in the
resource definition prior to launching a cluster.
If you have not added a public key at the time of launching
a cluster, you can login to the head node by IDE and update
the public key in ~/.ssh/authorized_keys file.
From the PW “Compute” dashboard, click on your name with an IP
address and make a note of it. You can also get the head node IP
address by clicking the i icon of the Resource monitor.
Click on the IDE link located on the top right side of
the PW interface to launch a new terminal.
From the menu option “Terminal”, click on the “New
Terminal” link.
From the new terminal, type
$ ssh<PastetheusernamewithIPaddress>
and press Enter.
This will let you login to the head node from the PW
interface.
You can use the toggle button to restore lustre file system
setting. You can also resize the LFS at a chunk size
multiple of 2.8 TB.
On current clusters, you can snapshot the login node’s root disk at any time.
This allows you to make changes on a running cluster, and snapshot it when you
are ready to create a bootable disk.
After you make changes to your login node, click the Create Snapshot on
the root disk from your cluster’s session page:
At the prompt, give the snapshot a name. The snapshot name must be between 3
and 51 characters, begin with a letter, and use only lowercase letters,
numbers, and hyphens:
When you click Create, you will automatically be redirected to the
snapshots page, where you can monitor its provisioning status.
It might take a
few minutes for the snapshot to finish provisioning.
To expand the provisioning status log, click the button in the Status column.
OS snapshots can be identified on the snapshots page by the Bootable
column. You can use the Group by dropdown at the top of the page to group
all of your OS snapshots together:
Once your OS snapshot is provisioned, you can select it as a usable
image in your cluster configuration:
For more information about creating OS snapshots, see the
Parallel Works User Guide <https://parallelworks.com/docs/compute/creating-os-snapshots>_.
Legacy OS snapshots do not appear as available options when you select your
image on the next-generation cluster provider. But you can use these
images by using the JSON editor on the cluster configuration page.
The first step is to find your legacy OS snapshot’s full resource ID. This
resource ID is the path to the image in the CSP to allow the system to find it.
The easiest way to do this is to review an existing legacy cluster definition
that has been configured to use a legacy OS snapshot. From the configuration
page, go to the JSON tab and look for the ‘controller_image’ line. If your OS
snapshot is only being used on a Slurm partition, find the partition and look
for the ‘elastic_image’ line:
Once you have your image ID, go to the configuration page of your new cluster
and open the JSON editor. If the JSON button is not visible on the top action
bar, it can be found under the extended menu:
The legacy snapshot can be configured on the ‘controllerImage’ line, as
well as any relevant ‘elasticImage’ lines in your Slurm partitions. When
you are finished configuring the cluster, click Save Json:
You can confirm the image selections from the definition page:
Finally, start your cluster to boot it into your legacy snapshot. Once the
cluster becomes active, you can follow the Creating OS snapshots on next-gen
clusters steps to create a new OS snapshot that is selectable from the image
dropdown. When you have confirmed that your new image is functional, you may
delete the legacy snapshot. Navigate to the Cloud Snapshots page under
your account, and click the trash can icon:
Running a Jupyter workflow on a Slurm compute node
The Parallel Works ACTIVATE platform provides standard scripts, called
workflows, to complete tasks on the platform. A Jupyter workflow is available
in the ACTIVATE Marketplace. (See the Parallel Works documentation for
directions to add workflows.)
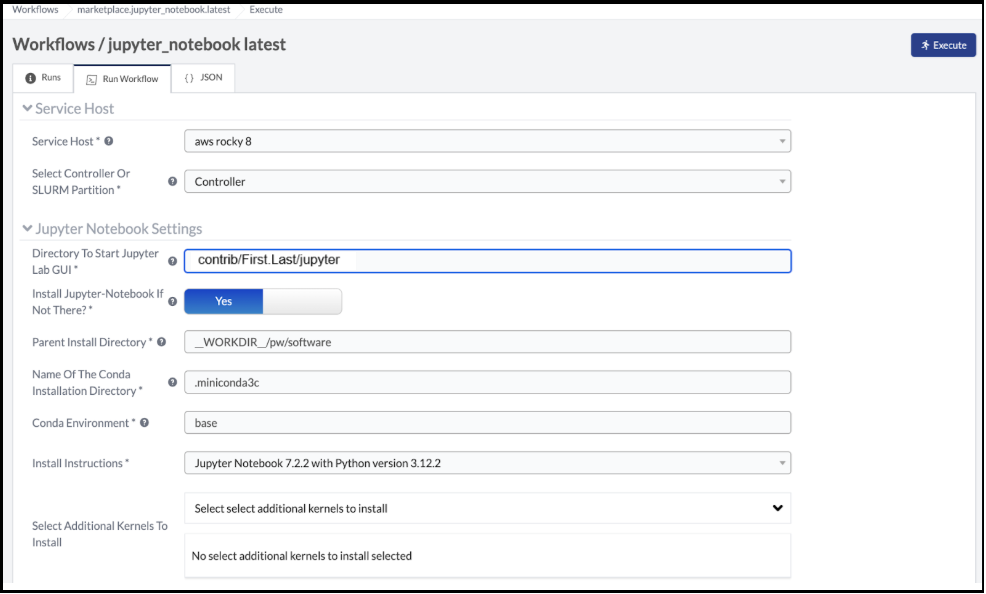
To use the Jupyter workflow on a Slurm compute node, first set a default
working directory for the session. Set the Directory To Start Jupyter Lab
GUI value to the path for your session default.
Note the directory listing in Jupyter, as compared to an ssh session:
You will also need to configure your AWS cluster with a partition, using GPU
nodes. Worker nodes in Slurm are divided into partitions based on
instance type, and are provisioned on demand when a job is submitted to the
queue. The default AWS configuration from the marketplace includes two
partitions as a base, “compute” and “batch”, as shown below:
You can either reconfigure one of these partitions with an alternate instance
type that has a GPU, or add a new partition to configure from scratch. If you
know you won’t use these starter partitions on your cluster, edit the
‘compute’ partition as needed, then remove the extra ‘batch’ partition.
Consider the following when you modify the partition:
Partition name. If you choose something other than ‘compute’, be specific.
Instance Type. Select a GPU node appropriate for your needs. If you’re
uncertain, check the AWS documentation for a summary
of the different GPU instance families available.
Zone. Select the zone you want to provision the cluster to. This parameter is
two-pronged and configures both the region (us-east-1) and availability zone
(b). It’s prudent to stay in the us-east-1 region, as you are likely to incur
egress charges if you are passing data between your contrib storage (located
in us-east-1), and a cluster located in a different region. The zone is less
important, unless you have other storages attached to the cluster and you
need to minimize your latency. Note that AWS tends to have different instance
availability in different regions and zones, so this might take some trial
and error. Also consider that on-demand GPU availability is heavily
constrained. It’s possible that your workflow will fail to start if there’s
not enough capacity to meet your request. If that happens, either
configure your cluster in a different zone, or just try again
later.
Once you have your cluster started with the partition configured, you can edit
the workflow form to direct the job to the compute partition (rather than the
controller node). This will submit a job to the Slurm scheduler and trigger a
node start.
See Configuring clusters
for complete information on configuring clusters and partitions.
Reference Jupyter on RDHPCS Systems to use or install Mamba with
miniforge. Place the miniforge installation in a project directory
or your home directory $HOME/miniforge3.
Once mamba is installed, create a new environment and install the jupyterlab
package into it:
$ mamba create -n mambaenv jupyterlab
Set up the workflow form as shown in the image below. The main details are:
Toggle ‘Install Jupyter-Notebook If Not There?’ to No
Update the ‘Command To Load Jupyter Notebook To The PATH’ line to provide
the path to the conda init script, and activate your environment
4. From here, execute the workflow and get to the Jupyterlab interface:
.. image:: /images/mambo2.png
You can use a node’s hostname to ssh
to compute nodes in your cluster from
the head node. You do not
necessarily need to have a job running on the node, but the node
must be in a powered on state. (Note that most resource
configurations suspend compute nodes after a period of
inactivity.)
Use sinfo or squeue to view active nodes:
$ sinfo
PARTITION AVAIL TIMELIMIT NODES STATE NODELIST
compute*  up    infinite      4 idle~ compute-dy-c5n18xlarge-[2-5]
compute*  up    infinite      1 mix   compute-dy-c5n18xlarge-1

$ squeue
JOBID PARTITION NAME USER     ST   TIME  NODES NODELIST(REASON)
2     compute   bash Matt.Lon  R   0:33  1     compute-dy-c5n18xlarge-1
Cloud projects start with
ca- (AWS), cg- (GCP), or -cz (Azure).
To use the RDHPCS Cloud system, you must have an account on a
project allocated to a cloud resource. See Request access to RDHPCS projects for details.
Project short name, in the format: <cloud platform abbreviation>-<project
name> For example ca-epic stands for AWS Epic, cz-epic for Azure epic, and
cg-epic for Google cloud Epic.
Brief description of your project.
Portfolio name.
Principal Investigator [PI] name.
Technical lead name [TL]. (If the project’s PI and TL are the same, repeat
the name.)
Allocation amount.
Once you have the necessary approvals, you can request the project
in AIM.
Access the Account Information Management website and complete the form
View all projects, then click the CreateaProject button.
Fill in the fields with the information from the allocation committee:
Project short name, in the format: <cloudplatformabbreviation>-<projectname>
Example: ca-epic is for AWS Epic, cz-epic is for Azure Epic,
and cg-epic is for Google cloud Epic.
Brief description of your project. Provide the helpdesk ticket for
allocation request
Portfolio name.
Principal Investigator [PI] name.
Technical lead name [TL]. In some case, a project’s PI
and TL may be the same person. If that is the case, repeat
the name.
The user can Request access
to RDHPCS projects,
including Cloud project, through the AIM system.
All RDHPCS users can access to Parallel Works
with appropriate authentication.
To prevent unexpected cost increases, consider the following:
Set up Alerts - Runtime alert: Enable runtime alerts in your Cluster
Configuration to receive hourly notifications on your active cluster.
Set up Alerts - Session Cost limit: Enable session cost limit, to
get notifications when a session reaches a preset dollar threshold.
Monitor Active Clusters: In the Monitor - Instances panel, identify
active clusters. Click the link to view compute nodes and their status.
Analyze Cost Anomalies: Use the Cost dashboard to detect cost anomalies
based on the usage. A filter lets you project costs in near-real time.
Review Daily Usage Reports: Project PIs and Tech Leads receive a daily
NOAA Cloud Usage Report for email. Review the prior day’s usage, and
discuss any inconsistent increases in usage with team members.
Manage Compute Clusters boot disk cost: The Compute Clusters form offers
two options for stopping a cluster:
Hibernation or Stop: Use this option to preserve custom software
installed in the session on the boot disk. Be aware that boot disk
storage costs will be incurred when the cluster is shut down with this
option.
Destroy: Select this option if no changes have been made to the boot
disk. In most cases, select this is the option to shutdown the cluster.
Stay on the latest version, always use the latest version of the Compute
Clusters configuration, and load configuration from the marketplace.
Lustre is a parallel file system, available as ephemeral and persistent storage
on the AWS, Azure, and GCP cloud platforms. A lustre file system can be
attached and mounted on a cluster, and is accessible only from an active
cluster. To create a lustre file system, access the Storage tab, and click Add
Storage. You can create any number of lustre file systems. See this article for
information on creating a storage link.
Bucket storage and Block blob storage are containers for objects. Metadata can
include use cases, such as data lakes, websites, mobile applications, backup
and restore, archive, enterprise applications, IoT devices, or big data
analytics. On AWS and GCP, the storage is called S3 bucket, and bucket
respectively. Azure uses Blob storage, which
functions which functions as a bucket and an NFS storage.
Pricing information is available at this link .
Projects using AWS and GCP platforms
can create as many buckets as needed, and mount them on a cluster. The
project’s default bucket is accessible from the public domain using keys.
The contrib file system in Cloud is similar to on-premise contrib. It is used
to store files for team collaboration. You can use this storage to install
custom libraries or user scripts.
The contrib filesystem is built on the cloud provider’s native NFS service,
(EFS in AWS, Azure Files in Azure, and GFS in GCP). The pricing on the
AWS EFS is based on the amount of storage used, whereas Azure and GCP pricing
is based on the provisioned capacity. This makes the AWS contrib cost
lower than Azure and GCP, comparatively. To find the pricing from the
Parallel Works Home, click on the NFS link and enter a storage size.
At any time, You can increase the size of your provisioned storage.
AWS Contrib storage charge is $0.30 per GB per Month. The cost is calculated
based on the storage usage. Both AWS and Azure charge based on usage, with a
pay-as-you-go model like your electricity bill.
GCP charges on contrib volume [NFS] allocated storage. The default size is
2.5TiB, costing about $768.00 per month. Users can now create an unlimited NFS
contrib volume with custom IO settings, share it with their project
members, and attach to a cluster. Older projects come with a contrib volume,
which can be removed by request. Send email to rdhpcs.cloud.help@noaa.gov, with
the subject Remove Contrib Volume.
For older projects, a contrib volume may be present by default. This contrib
volume can be removed by submitting a request to rdhpcs.cloud.help@noaa.gov
with the subject line “Remove Contrib Volume.”
Users now have the flexibility to create their own NFS volumes with
custom input/output (IO) settings in all Cloud platforms. These volumes can be
shared with project members and attached to a cluster.
You can estimate the hourly cost of your experiments from the Parallel
Works (PW) platform. Click the Resources tab, double click your resource
definition, then click the Definition tab. When you update the required
compute and lustre file system size configuration, the form dynamically shows
an hourly estimate. Multiply this hourly cost by the run time, to estimate the
cost of a single experiment.
For example, if the hourly estimate is $10, and your
experiment would run for 2 hours, the estimated cost
for your experiment would be $10 multiplied by 2: $20.
To derive the project allocation cost, multiply
the run time cost with the number of runs required to complete the
project. If your project would require a model to run 100 times,
multiply that number by a single run cost. In this example,
the cost would be 100 x $20 = $2,000.00.
You can derive project allocation cost by multiplying the
run time cost with the number of runs required to complete
the project.
Note
In addition to run time, there are costs associated with maintaining your
project, like contrib file system, object storage to store
backup, and egress.
See the Costing Dashboard
section in the Parallel Works user guide for complete information.
The PW Cost dashboard offers an almost real time estimate of your session. On
your PW landing page, click the Cost. Under Time Filter, choose the
second drop down box and select the value “RT” [Real Time]. Make sure the “User
Filter” section has your name. The page automatically refreshes with the cost
details. The estimate on the Cost dashboard is refreshed every 5 minutes.
This example illustrates estimation, when your project requests a dedicated
number of HPC compute nodes or has an HPC system reservation for
HPC compute nodes.
For this example, assume that the dedicated/reserved nodes have 200 cores and
the length of the dedication/reservation is 1 week (7 days). The core-hours
used would be 33,600 core-hours (200 cores * 24 hrs/day * 7 days). In GCP, two
vCPUs makes one physical core. So, a2-highgpu-1 has 12 vCPUs, which means 6
physical cores. Now, assume that your job takes 4 hours to complete. You would
calculate the number of core hours as: number of nodes x number of hour x
number of cores = 1 x 4 x 6 = 24 core hours.
Note
GCP’s GPU to vCPUs conversion can be found here
In GCP, two vCPUs makes one physical core.
PW’s cost dashboard is a good tool to find unit cost,
and extrapolate it to estimate usage for PoP.
Warning messages from the on-prem system about exceeding quota
Parallel Works will copy programs and data files into your
$HOME/pw directory. This can cause your quota (storage allocation)
to be exceeded when running a workflow. This can be resolved by
moving that directory to one of your project locations and symlinking
the directory.
For example, if you try to run VSCode workflow on Hera, it will
install software in your $HOME/pw directory where you have a very
limited quota. To address this issue follow the steps below:
1. Check whether the following directory exists on the on-prem system
where you are getting the quota error from:
$HOME/pw
If it does, move it to your project space and create a symlink as shown
below:
The PW token lasts up to 24 hours before resetting. Under this setting, you
can run a cloud provider’s CLI or PW CLI commands. The following example will
generate a token, insert the commands into a file named aws-creds and source
that file.:-
Users can customize the expiration date for their created API keys
for 7, 30, 60, 90 or no expiration days.
By default, the PW CLI is pre-installed on user workspaces, cloud clusters, and
existing clusters. When you connect to an on-prem HPC system through Parallel
Works, the PW CLI commands are available from the controller node.
Note
The PW API key is only relevant to PW based operations.
Occasionally, a user user trying to run a workflow received a warning about
exceeding quota in the home file system. For example, if you try to run VSCode
workflow on Hera, it will try to install a bunch of software in the $HOME/pw
directory where quota is limited.
If you receive the warning, try the following:
1. Check whether the following directory exists on the on-prem
system where you are getting the quota error from: $HOME/pw 2. If it does, move
it to your project space and create a symlink as shown below:
it may be related to an issue in user’s environment.
First, ensure there is a minimum 100 MB free space in the home directory
for the PW agent file to install. If there’s enough space, perform one of the
following checks:
Remove the https_proxy setting from the .bashrc file. This will stop using
the proxy for all https traffic.
When you make proxy settings in the .bashrc file, add
exportNO_PROXY=noaa.parallel.works
This should bypass the proxy for anything on the platform.
Either of these changes should allow the agent to connect back to the platform
to create the connection.
If neither scenario applies, please open a help desk case for
assistance.
The Parallel Works cost dashboard will
show your project’s current costs, and a breakdown of how those costs were
used.
The cloud team also produces a monthly usage report
that has an overview of costs for all cloud projects. Those reports are useful
for portfolio managers (PfM) and principal investigators (PI) to monitor
multiple projects in a single spreadsheet.
Occasionally the RDHPCS cloud team and other cloud users give presentations
that we record. These presentations are available for RDHPCS user consumption
on an RDHPCS internal site.
Send an email to rdhpcs.cloud.help@noaa.gov. to automatically
open a ticket in the RDHPCS helpdesk system. The typical response time is
within two hours during normal business hours.
To close a project, email rdhpcs.aim.help@noaa.gov to create an AIM
ticket. Make sure that all data are migrated, and custom snapshots are
removed before you send the request to the AIM. If you do not need
data from the referenced project, be sure to include that information
in the ticket so that the support can drop the storage services.
How do I connect the controller node from outside the network?
What are the project allocation usage limits and actions?
Used allocation at 85% of the budget allocation:
When an existing project usage reaches 85% of the allocation, the
Parallel Works [PW] platform sends an email message to principal
investigator [PI], tech lead [TL] and admin staff.
Users can continue to start new clusters and continue the
currently running clusters.
A warning message appears on the PW compute dashboard
against the project.
PI should work with the allocation committee on
remediation efforts.
Used allocation at 90% of the budget allocation:
When an existing project usage reaches 90% of the allocation, the
Parallel Works platform sends an email message to principal
investigator, tech lead and admin staff.
Users can no longer start a new cluster and may continue the
currently running clusters, but no new jobs can be started.
Users must move data from the contrib and object storage to
on-premise storage.
A “Freeze” message appears on the PW compute dashboard against the
project.
PI should work with the allocation committee on remediation
efforts.
Used allocation at 95% of the budget allocation:
When an existing project usage reaches 95% of the allocation, the
Parallel Works platform sends an email message to principal
investigator, tech lead and admin staff.
Terminate and remove all computing/cluster resources.
Data at buckets will remain available as will data in
/contrib. However, only data in the object storage will
be directly available to users.
Notify all affected users, PI, Tech Lead, Accounting Lead
via email that all resources have been removed.
Disable the project.
Used allocation at 99.5% of the budget allocation:
Manually remove the project resources.
Notify COR/ACORS, PI and Tech Lead, Accounting Lead via
email all resources have been removed.
How do I request a project allocation or an allocation increase?
RDHPCS System compute allocations are determined by the RDHPCS
Allocation Committee (AC). To make a request, complete the
Allocation Request Form
After you complete the form, create a
Cloud help ticket to track the issue. Send email to
rdhpcs.cloud.help@noaa.gov, copy to gonzalo.lassally@noaa.gov, using
Cloud Allocation Request in the subject line.
A cluster owner can set up to send an email notification
based on the number of hours/days a cluster is up. You can
enable the notification from the Parallel Works resource
configuration page and apply it on a live cluster or set as
a standard setting on a resource configuration, so that will
take effect on clusters started using the configuration.
Your project’s permanent storage [AWS s3 bucket, Azure’s
Block blob storage, or GCP’s bucket] can be mounted on an
active cluster, or set to attach a bucket when starting a
cluster, as a standard setting on a resource configuration.
Having the permanent storage mounted on a cluster allows a
user to copy files from contrib or lustre to a permanent
storage using familiar Linux commands.
Sharing storage between the projects, enhanced capacity, and configuration
Note that the permanent storage and persistent storage must
be started separately before it can be attached to a
cluster. Storage resources can be started from the Compute
dashboard, Storage Resources section.
If you are a user belonging to more than one project, now
you can share storage between the projects. You can attach
other project storage from the resource configuration page.
Note that, a persistent lustre file system must be started
separately before it can be attached to a cluster.
Users may create as many permanent object storage [AWS S3
bucket, Azure’s block blob storage, and GCP’s bucket], and
lustre file system [ephemeral and persistent storage] on
your Cloud platform.
Open up the resource name definition, click on the _JSON
tab, add a parameter “root_size” with a value in the
cluster_config section, that fits your need, save and
restart the cluster.
In the below example, the root disk size is set to 256 GiB
If you’re running a workflow for the first time, you will
need to add it to your account first. From the Parallel
Works main page, click the workflow Marketplace button
located on the top right menu bar, looks like an Earth icon.
What different storage types and costs are available on the PW platform?
There are three types of storage available on a cluster,
those are lustre, object storage [ for backup & restore,
output files], and contrib file system [a project’s custom
software library].
Lustre file system
Parallel file system, available as ephemeral, and persistent
storage on the AWS and Azure cloud platforms. You can
create as many lustre file systems as you want from the PW
Storage tab by selecting the “add storage” button.
Cost for lustre storage can be found at the definition
page when creating storage.
Lustre file system can be attached and mounted on a
cluster. It is accessible only from an active cluster.
Bucket/Block blob storage
A bucket or Block blob storage is a container for objects.
An object is a file and any metadata that describes that
file.
Use cases, such as data lakes, websites, mobile
applications, backup and restore, archive, enterprise
applications, IoT devices, and big data analytics.
On AWS, and GCP, the storage is called S3 bucket, and
bucket respectively, whereas in Azure, the storage used is
Block blob storage, which functions as a bucket and an NFS
storage.
AWS S3 bucket pricing [us-east-1]: $0.021 per GB per
Month. The cost is calculated based on the storage usage.
For example, 1 PB storage/month will cost $21,000.
Azure object storage and contrib file system are the
storage type. The pricing for the first 50 terabyte (TB) /
month is $0.15 per GB per Month. The cost is calculated
based on the storage usage. See: Azure Pricing
Google cloud bucket storage pricing: Standard storage
cost: $0.20 per GB per Month. The cost is calculated based
on the storage usage. See: Cloud Bucket pricing
Projects using AWS, and GCP platforms can create as many
buckets as needed, and mount on a cluster. Project’s
default bucket is accessible from the public domain using
the keys.
Contrib file system
Contrib file system concept is similar to on-prem contrib,
used to store files for team collaboration. This storage can
be used to install custom libraries or user scripts.
AWS Contrib storage [efs] pricing [us-east-1]: $0.30 per
GB per Month. The cost is calculated based on the storage
usage. See: AWS Pricing
Azure contrib cost is explained above in the block blob
storage section.
Both AWS and Azure charge based on the usage, as a
pay-as-you-go model like your electric bill. GCP charges
on allocated storage, so whether the storage is used or not,
the project pays for the provisioned capacity.
The default provisioned capacity of Google Cloud contrib
file system is 2.5 TiB, costs $768.00 per month. The contrib
volume can be removed from a project by request, email to
rdhpcs.cloud.help@noaa.gov [ OTRS ticket on RDHPCS help.]
Traffic between regions will typically have a $0.09 per GB
charge for the egress of both the source and destination.
Traffic between services in the same region is charged at
$0.01 per GB for all four flows.
AWS’s monthly data transfer costs for outbound data to the
public internet are $0.09 per GB for the first 10 TB,
dropping to $0.085 per GB for the next 40 GB, $0.07 per GB
for the next 100 TB, and $. 05/GB greater than 150 TB.
P5 [Nvidia H100]: available in the following availability zones
us-east-1f
us-east-2c
us-east-2a
us-east-2b
P4 [Nvidia A100]: available in the following availability zones:
us-east-1c
us-east-1b
us-east-1a
us-east-2a
us-east-2b
P3 [Nvidia Tesla V100] : available in the following availability zones:
us-east-1d
us-east-1b
us-east-1e
us-east-1c
us-east-1a
us-east-1f
us-east-2c
us-east-2b
us-east-2a
G3 [Nvidia Tesla M60] (graphics processing) available in the following
availability zones:
us-east-1e
us-east-1c
us-east-1b
us-east-1f
us-east-1d
us-east-1a
G4ad [AMD Radeon Pro V520] for graphics processing available in the
following availability zones:
us-east-1c
us-east-1a
us-east-1b
us-east-1d
us-east-2a
us-east-2b
us-east-2c
G5 [Nvidia A10G Tensor Core] for graphics and machine learning, available in
the following availability zones:
us-east-1d
us-east-1b
us-east-1c
us-east-1a
us-east-1f
us-east-2b
us-east-2c
us-east-2a.
G6 [Nvidia L4 Tensor Cores] for graphics and machine learning available in
the following availability zones:
us-east-1a
us-east-1c
us-east-1b
us-east-1d
us-east-2c
us-east-2a
us-east-2b
Note
We currently have a quota for 2,400 vCPUs. On-demand availability depends on
availability at a given time in the market, and is outside our control.
Users may want to try different availability zones to acquire GPUs.
Why does the remote desktop show multiple xterm terminals, and/or xclocks?
This issue can be caused by an error in the $HOME/.vnc/xstartup file.
To correct it, edit the file, keeping the following lines:
If user doesn’t want xclock or the terminal to start automatically, run the
following to reset:
touch~/.Xclients
A PW session that shows “Running” isn’t accessible and there’s no log error
This typically occurs when the system runs out of resources, usually due
to an out-of-memory situation. The display rolls back to requested since the
instance is no longer reachable, and it’s waiting for status updates from the
instance. Sometimes the out-of-memory killer will kick in and clean up some
processes to allow the system to continue functioning, but this event isn’t
guaranteed to clean up quickly, or to leave the system in a functional state
after cleanup when it does run.
To work around this, if your workflow allows it,
increase the size of the instance, or add a compute
partition and send the work off to worker nodes.
There are several resource types that are part of a user
cluster.
We are working on adding more clarity on the resource cost
type naming and cost. Broadly, the following cost types are
explained below.
UnknownUsageType:
Network costs related virtual private network. See
the Google CSP
and Amazon AWS
documentation for more information.
Other Node:
Controller node cost.
Storage-BASIC_SSD:
On the Google cloud, “contrib” volume billing is
based on the allocated storage. Contrib volume allocated storage
2.5TB. On other cloud platforms, the cost is based on the storage
used.
The default CSP resource definition in the platform is
fv3gfs model at 768 resolution 48-hours best performance
optimized benchmark configuration.
From the PW platform top ribbon, click on the “Resources”
link.
Click on the edit button of a PW v2 cluster [aka elastic
clusters, CSP slurm] resource definition.
By default, there are two partitions, “Compute” and “batch”
as you can see on the page. You can change the number of
partitions based on your workflow.
From the resource definition page, navigate to the compute
partition.
Max Node Amount parameter is the maximum number of nodes in
a partition. You can change that value to a non-zero number
to resize the compute partition size.
You may remove the batch partition by clicking on the
“Remove Partition” button. You can also edit the value for
Max Node Count parameter to resize this partition.
Lustre filesystem is an expensive resource. You can disable
the filesystem or resize it. The default lustre filesystem
size is about 14TiB.
Keeping the bucket and cluster within the same region to lower latency and Cost
Moving data between regions within a cloud platform will incur cost.
For example, if the cluster and the bucket you were copying to exist in
different regions, the cloud provider will charge for every bite that
leaves.
It is possible to provision your own buckets from the PW
platform storage menu. This would also have the benefit of reducing
the overall time you spend transferring data, since it has less
distance to travel. If you have any further questions about this,
please open a help desk ticket. We’d also be happy to work with you.
Join one of the cloud office hours to ask questions.
How do I create a custom [AMI, Snapshot, Boot disk, or machine] image?
If a user finds specific packages are not present in the
base boot image, the user can add it by creating own custom
image. Follow the steps to create a custom snapshot.
After a snapshot is created, the next step is to reference
it in the cluster Resource configuration.
From the Parallel Works banner, click on the “Compute” tab,
and double click on the resource link to edit it.
From the Resource Definition page, look for the “Controller
Image” name. Select your newly created custom snapshot name
from the drop down list box.
Scroll down the page to the partition section. Change the
value of “Elastic Image” to your custom image. If you have
more than one partitions, then change “Elastic Image” value
to your custom image name.
Click on the “Save Resource” button located on the top right
of the page.
Now launch a new cluster using the custom snapshot from the
“Compute” page. After the cluster is up, verify the
existence of custom installed packages.
How can I automatically find the hostname of a cluster?
By default, the host names are always going to be different
each time you start a cluster.
You can find CSP information using the PW_CSP variable, as
in the example:
$echo$PW_CSP
google
There are a few other PW_* vars that you may find useful:
ssh tunnels are a useful way to connect to services running
on the head node when they aren’t exposed to the internet.
The Jupyterlab and R workflows available on the PW platform
utilize ssh tunnels to allow you to connect to their
respective web services from your local machine’s web
browser.
Before setting up an ssh tunnel, it is probably a good idea
to verify standard ssh connectivity to your cluster (see how
do I connect to my cluster). Once connectivity has been
verified, an ssh tunnel can be setup like so:
In this example, I am tunneling port 8888 from the host
‘userid-gclustera2highgpu1g-00012-controller’ to port 8888
on my local machine. This lets me direct my browser to the
URL ‘localhost:8888’ and see the page being served by the
remote machine over that port.
How do I turn off Lustre filesystem from the cluster?
From the Resources tab, select a configuration and click the
edit link.
Scroll down the configuration page to the “Lustre file
system” section. Use the toggle button to “No” to turn off
the lustre file system [LFS]. This setting lets you create a
cluster without a lustre file system.
Running conda init bash will setup the ~/.bashrc file so it
will activate the default environment when you login.
If you want to use a different env than what is loaded by
default, you could run this to change the activation:
$echo"conda activate <name_of_env>">>~/.bashrc
Since your .bashrc shouldn’t really change much, it might be
ideal to set the file up once and then back it up to your
contrib (somewhere like
/contrib/First.Last/home/.bashrc), then your user boot
script could simply do:
If your cluster requires lustre file system [ephemeral or
persistent], or additional storage for backup, start at the
“Storage” section and then use the “Resource” section.
You can enable this functionality on your active or new
cluster. This setup will help you send a reminder when your
cluster is up a predefined number of hours.
You can turn on this functionality when creating a new
resource name. When you click on the “add resource” button
under the “Resource”, you find the run time alert option.
You can enable this functionality on a running cluster, by
navigating to the “properties” tab of your resource name
under the “Resource” tab.
Missing user directory in the group’s contrib volume
A user directory on a group’s contrib volume can only be
created by an owner of a cluster, as the cluster owner only
has “su” access privilege. Follow the steps to create a
directory on contrib.
Start a cluster. Only the owner has the sudo su
privilege to create a directory on contrib volume.
Start a cluster, login to the controller node, and
create your directory on the contrib volume.
Start a cluster by clicking on the start/stop button
When your cluster is up, it shows your name with an IP
address. Click on this link that copies username and IP
address to the clipboard.
Click on the IDE button located top right on the ribbon.
Click on the ‘Terminal’ link and select a ‘New Terminal’
SSH into the controller node by pasting the login
information from the clipboard.
$ ssh User.Name<IP address>
List your user name and group:
$ id
uid=12345(User.Id) gid=1234(grp)
groups=1234(grp)
context=unconfined_u:unconfined_r:unconfined_t:s0-s0:c0.c1023
$ sudo su -
[root@awsv22-50 ~]$
[root@awsv22-50 ~]$ cd /contrib
[root@awsv22-50 contrib]$
[root@awsv22-50 contrib]$ mkdir User.Id
[root@awsv22-50 contrib]$ chown User.Id:grp User.Id
[root@awsv22-50 contrib]$ ls -l
drwxr-xr-x. 2 User.Id grp 6 May 12 13:06 User.Id
Your directory with access permission is now complete.
Your directory is now accessible from your group’s clusters.
Contrib is a permanent storage for your group.
You may shutdown the cluster if the purpose was to create
your contrib directory.
Why does the owner’s home directory differ from the shared users’ directory?
Every cluster is set up where the owner of it has an
ephemeral home directory that isn’t linked from contrib, but
on multi-user clusters, all additional users that are added
do get home linked from contrib.
The projects using Google cloud can request to drop their
contrib volume to save cost. Google charges on provisioned
nfs capacity, whereas others charge on the used storage.
So when people start clusters in some cases they may not
have a contrib dir so owners don’t want to link home
directory to their contrib directory.
What are “Compute” and “Batch” sections in a cluster definition?
The sections “Compute” and “Batch” are partitions. You may
change the partition name at the name field to fit your
naming convention. The cluster can have many partitions with
different images and instance types, and can be manipulated
at the “Code” tab.
You may resize the partitions by updating “max_node_num”, or
remove batch partition to fit your model requirements.
In this case, there are two nodes that are on and idle
(userid-gcp-00141-2-[0001-0002]) You can ignore the
nodes with a ~ next to their state. That means they are
currently powered off.
How to sudo in as root or a role account on a cluster?
The owner of a cluster can sudo in as root and grant sudo
privilege to the project members by adding their user id in
the sudoers file.
Only the named cluster owner can become root. If the cluster
owner is currently su’d as another user, they will need to
switch back to their regular account before becoming root.
Sudoers file is: ls -l /etc/sudoers
Other project members’ user id can be found at /etc/passwd
file. You may update this file manually or by bootstrap
script, the change is taken effect immediately.
A role account is a shared workspace for project members on
a cluster. By su’d to a role account, project members can
manage and monitor their jobs.
There are two settings that must be enabled prior on a
resource definition in order to create a role account in a
cluster. On the resource definition page, select the “Multi
User” tab to “Yes”, and from the “Sharing” tab, check the
“View and Edit” button.
The command to find the name of your project’s role account
from /etc/passwd is.
By default bootstrap script changes only runs on the MASTER
node of a cluster.
To run on all nodes (master and compute) have your user
script first line be ALLNODES.
The following example script installs a few packages, and
reset the dwell time from 5 minutes to an hour on the
controller and compute nodes. Do not add any comments on the
bootstrap script, as that would cause in code execution
failure.
ALLNODES
set+xset-e
echo"Starting User Bootstrap at $(date)"
sudorm-fr/var/cache/yum/\*
sudoyumcleanall
sudoyumgroupsmarkinstall"Development Tools"-y
sudoyumgroupinstall-y"Development Tools"
sudoyum--setopt=tsflags='nodocs'\--setopt=override_install_langs=en_US.utf8\--skip-broken\install-yawsclibison-develbyaccbzip2-devel\ca-certificatescshcurldoxygenemacsexpat-develfile\flexgitgitflowgit-lfsglibc-utilsgnupggtk2-develksh\lesslibcurl-devellibX11-devellibxml2-devellynx\lz4-develkernel-develmakeman-dbnanoncurses-devel\neditopenssh-clientsopenssh-serveropenssl-develpango\pkgconfigpythonpython3python-develpython3-devel\python2-asn1cryptopycairo-develpygobject2\pygobject2-codegenpython-boto3python-botocore\pygtksourceview-develpygtk2-develpygtksourceview-devel\python2-netcdf4python2-numpypython36-numpy\python2-pyyamlpyOpenSSLpython36-pyOpenSSLPyYAML\python-requestspython36-requestspython-s3transfer\python2-s3transferscipypython36-scipypython-urllib3\python36-urllib3redhat-lsb-corepython3-pycurlscreen\snappy-develsquashfs-toolsswigtcltcshtexinfo\texline-latex\*tkunzipvimwget
echo"USER=${USER}"echo"group=$(id-gn)"echo"groups=$(id-Gn)"
sudosed-i's/SuspendTime=300/SuspendTime=3600/g'/mnt/shared/etc/slurm/slurm.conf
if[$HOSTNAME==mgmt\*];thensudoscontrolreconfigure
fi
sudosacctmgraddclustercluster-i
sudosystemctlrestartslurmdbd
sudoscontrolreconfig
echo"Finished User Bootstrap at $(date)"
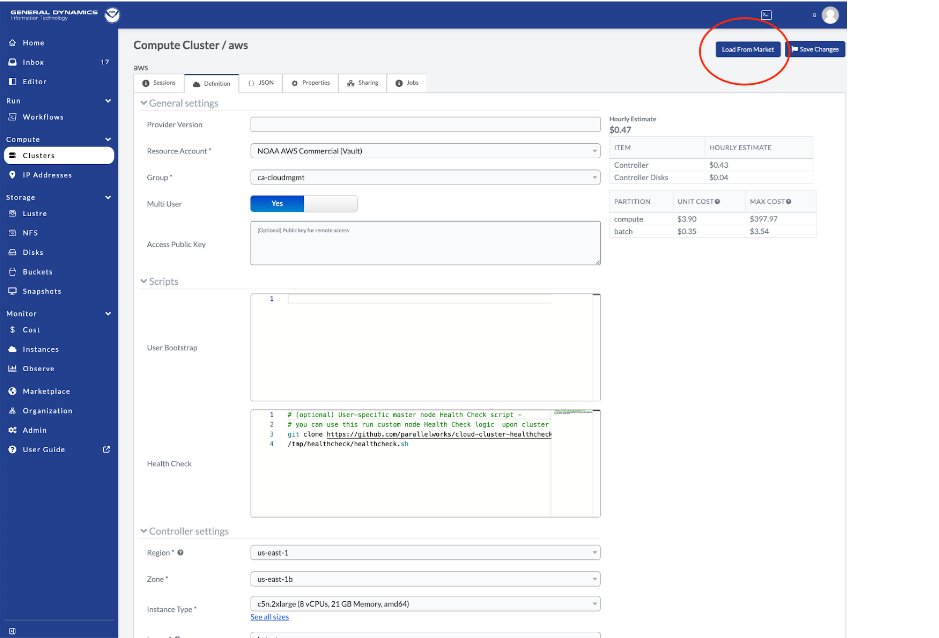
How can I configure a CentOS Cluster to use Rocky 8 (latest)
If you have already made extensive modifications to your cluster’s definition,
you may prefer to revert the required settings by hand without loading a config
from the Marketplace. There are two primary settings that need to be updated,
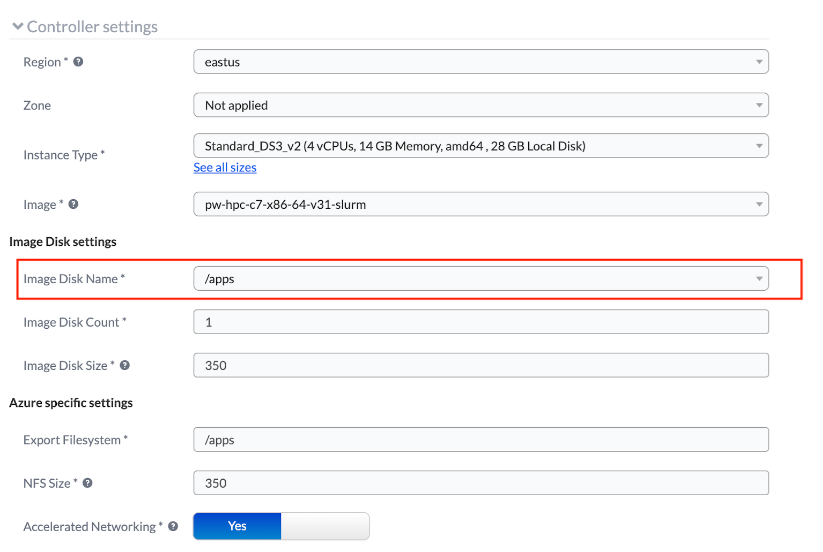
the OS image Rocky 8 (latest), and the /apps disk snapshot. Keep in mind
that the OS image will need to be set on the controller and every partition you
have configured on the cluster.
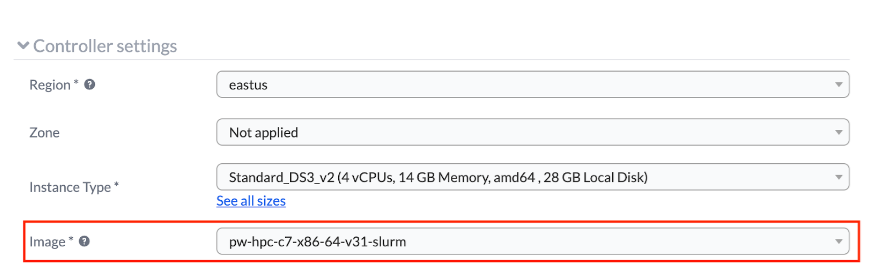
From the CentOS cluster configuration, find the Image* dropdown under the
Controller settings and select the image.
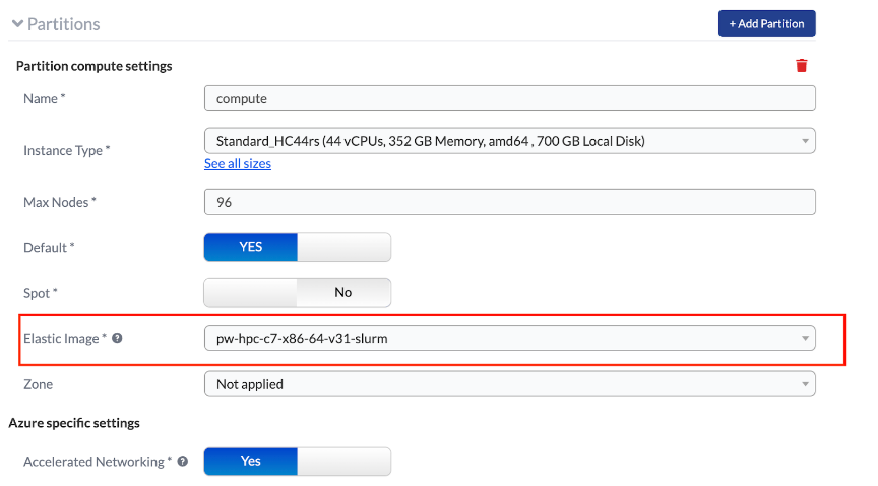
Follow the same procedure on each compute partition to select the
Rocky 8 (latest) image under the ElasticImage* dropdown:
The software and modules under /apps were built specifically for their
target operating systems, so the Rocky 8 disk also needs to be selected.
Click Save Changes.
We recommend that you also replace any existing CentOS 7 based persistent
Lustre resources to use Rocky 8 as well. The suggested method to do this is to
duplicate your existing storage configuration, and copy your data to the new
Lustre, either by copying directly from the old storage, or by syncing it with
a bucket. Once you have verified that all of your data has been migrated, you
can shut down the old file system. If your data is backed up to a bucket
already, you can also re-provision your existing Lustre configuration and
re-sync the data.
Automate startup/shutdown for a group of clusters [CI/CD] in Parallel Works
You can use the Parallel Works REST API to start a group of clusters, wait for
their master node IP addresses, and then run ssh commands using the fetched IP
addresses of the started master nodes. For details, click the Parallel
Works repository
link, then scroll down for Cluster Automation information.
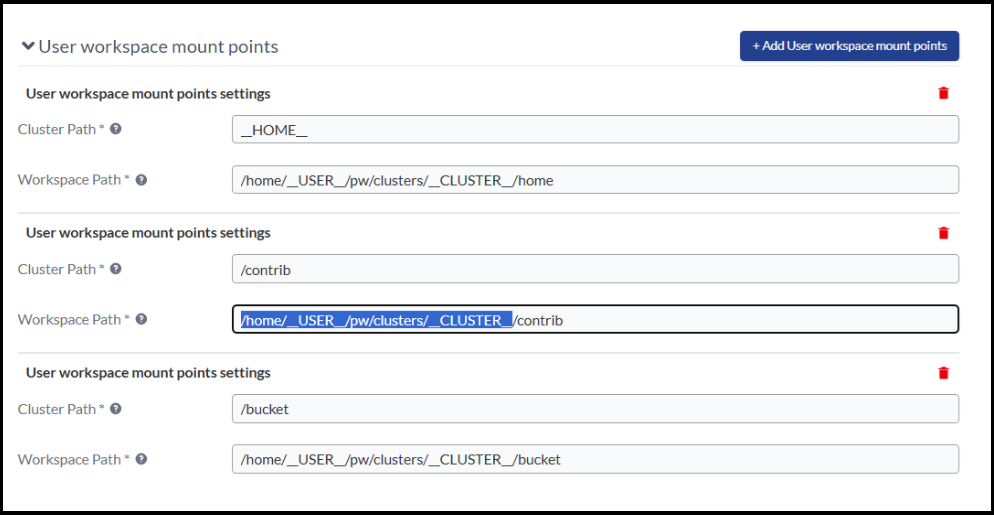
How to transfer files from a workstation to a Cloud cluster
Using the Parallel Works’ menu Editor, you can used the Explorer function to
transfer files between workstation and cluster. Currently this requires an
additional mapping of the targeted file system in the cluster configuration.
The target file system is where you would like to have the files copied, and it
can be a bucket, NFS or contrib filesystem. To set up the advanced setting
change:
Select a cluster configuration, then select the Edit option.
Scroll all the way down, and click Advanced Settings.
In the Advanced settings form, scroll down to the
link User workspace mount points.
Map the Home, Bucket or Contrib as illustrated below:
From the top menu, click Save Changes.
Launch the cluster.
Once the cluster is up, open the Editor menu, and locate your cluster name
in the Explorer, as illustrated below:
Use the Explorer File menu to upload or download files.
Consider the following Best Practices to prevent runaway cost increases.
Set up alert - Runtime Alert. Enable runtime alerts in your Cluster
Configuration to receive hourly notifications on your active cluster.
Set up alert - Session Cost Limit. Enable session cost limit to receive
notifications when a session reaches a preset dollar threshold.
Monitor Active Clusters. In the Monitor - Instances panel, identify
active clusters and click on the link to view compute nodes and their status.
Analyze Cost Anomalies. Use the Cost dashboard to detect cost anomalies
based on the usage. There is a filter available to view near real-time
project costs.
Review Daily Usage Reports. Project PIs and Tech Leads receive a daily
NOAA Cloud Usage Report for email. Review the prior day’s usage and
discuss any inconsistent increases in usage with team members.
Manage Compute Clusters boot disk cost.
The Compute Clusters form offers two options for stopping a cluster:
Stop: Use this option to preserve custom software installed in the session
on the boot disk. Be aware that boot disk storage costs will be incurred
when the cluster is shut down with this option.
Destroy: Select this option if no changes have been made to the boot disk.
In most cases, select this option to shutdown the cluster.
Stay on the latest version. Always use the latest version of the Compute
Clusters configuration, and load configuration from the marketplace.
Locate your project’s access and secret keys and access instructions
From PW’s home page, inside the “Storage Resources” section, locate
your project’s bucket. Click on the key icon to find the bucket name,
keys and sample command to access the bucket.
Azure azcopy install on an on-prem system. Files transfer to a cloud bucket
Over time, the AzCopy download link will point to new versions of
AzCopy. If your script downloads AzCopy, the script might stop working
if a newer version of AzCopy modifies features that your script
depends upon.
To avoid these issues, obtain a static (unchanging) link to the
current version of AzCopy. That way, your script downloads the same
exact version of AzCopy each time that it runs.
This will leave the azcopy tool in the current directory, which
you can then copy to any directory.
Locate your project’s credentials and access instructions
From PW’s home page, inside the “Storage Resources” section locate
your project’s bucket. Click on the key icon to find the bucket name,
keys and sample command to access the bucket.
Please refer to the AzCopy guide for information on how to use AzCopy.
GCP gcloud install on an on-prem, and files transfer to a cloud bucket
Add the gcloud CLI to your path. Run the installation script from the
root of the folder you extracted to using the following command:
$./google-cloud-sdk/install.sh
Start a new terminal and check gcloud tool in the access path:
$whichgcloud
~/google-cloud-sdk/bin/gcloud
From PW’s home page, inside the “Storage Resources” section locate
your project’s bucket. Click on the key icon to find the bucket name,
keys and sample command to access the bucket.
The recommended system for data transfers to/from NOAA RDHPCS systems
is the Niagara Untrusted DTN especially if the data transfers is being
done from/to the HPSS system.
If data is on Hera, the user will have to use 2-copy transfers, by
first transferring to Niagara and then pulling the data from the
Cloud, or use the utilities mentioned in the next section.
AWS CLI, available on Hera/Jet/Niagara, can be used on RDHPCS systems
to push and pull data from the S3 buckets. Please load the
“aws-utils” module.
moduleloadaws-utils
How do I use scp from a Remote Machine to copy to a bucket?
1. Create a cloud cluster configuration, and in the attached storage
section include bucket storage, note the mounted file system name
given for the bucket.
Azure uses the azcopy utility to push and pull data into their cloud
object store buckets. The azcopy utility can be installed standalone
or as part of the larger az cli. The “azcopy” command can run either
from the user’s local machine or the RDHPCS systems, such as Niagara,
mentioned in the next section. The gsutil utility is already
preinstalled on clusters launched through Parallel Works.
The azcopy utility becomes available on RDHPCS systems once the module
“azure-utils” has been loaded. To do that, run the command:
moduleloadazure-utils
It can be installed on your local machine/desktop by installing the
binary at the link below as documented below:
wget-Oazcopy.tgzhttps://aka.ms/downloadazcopy-v10-linux
tarxzvfazcopy.tgz
# add the azcopy directory to your path or copy the “azcopy”
executabletoadesiredlocationexportPATH=$PATH:$PWD/azcopy_linux_amd64_10.9.0</pre>
The GCP command line utility is gsutil. PW OS image has the GCP
utility gsutil installed. Follow the instructions at this link to
copy files to Google bucket:
How do I access Azure Blob from a Remote Machine?
The following instruction uses the long term access key available
from the PW file explorer: storage/project keys section, which is
going to be discontinued. We recommend using the short term access key
from the home:storage bucket as suggested in the link above.
Obtain the Blob bucket keys from the PW platform, as mentioned in the
section below, getting project keys. Then set the following
environment variables based on the keys there:
Obtain the Azure object store keys from the PW platform, as mentioned
in the section below, getting project keys. Then set the following
environment variables and activation command based on the keys there
(you should be able to copy and paste these). Once you run this once
on a host machine, it should store the credentials in your home
directory:
# project-specific credentialsexportAZURE_CLIENT_ID=<projectclientid>
exportAZURE_TENANT_ID=<projecttenantid>
exportAZCOPY_SPA_CLIENT_SECRET=<projectsecret>
# activate the project-specific keys for azcopy
azcopylogin--service-principal--application-id$AZURE_CLIENT_ID--tenant-id$AZURE_TENANT_ID
If following messages return at the login, the issue is likely from
the key ring propagation bug. In that case, type the following command and
re-try azcopy login.
Azure object store works differently than AWS and GCP in that objects
pushed or pulled into the object store container will immediately show
up in the /contrib directory on the clusters (ie the object store is
NFS mounted to /contrib). Buckets can only be used based on the user’s
assigned project space. Create sub-directories with the user’s
username at the top level.
Data Transfer between Compute Node and Azure Blob
The Azure blob storage is slightly different from AWS and GCP
clusters in that the blob storage automatically mounts directly to the
cluster’s /contrib directory. This means that as soon as files are
uploaded to the Azure blob storage using azcopy command, these files
directly appear in the NFS mounted /contrib directory without any
additional data transfer steps. The reverse is true as well in that
when files are placed into a cluster’s /contrib directory, these files
will be available for immediate download using azcopy on remote hosts.
When a file is copied to Azure blob, the ownership is changed to “nobody:root”.
Change the ownership of the file using “chown” command to access the file(s).
Example:
How do I get AMD processor resources configuration?
AMD processor based instances or VMs are relatively less
expensive than Intel. Cloud services providers have
allocated processor quota on the availability zones where
AMD processors are concentrated. In Parallel Works, the AMD
configurations are created pointing to these availability
zones.
To create an AMD resource configuration, follow the steps
explained in the link below. The instructions will direct
you to restore configuration, then choose the AMD Config
option from the list.
You may resize the cluster size by adjusting max node count,
and enable or disable lustre as appropriate to your model.
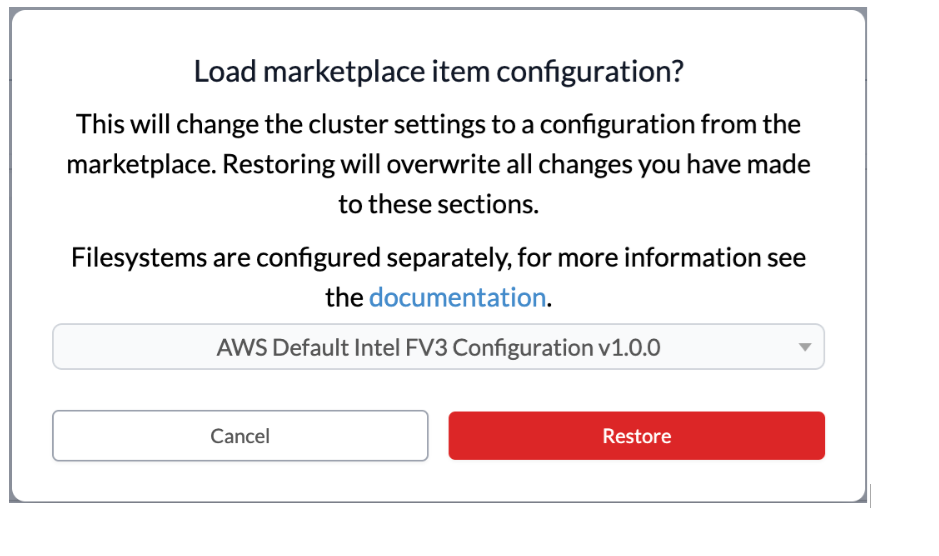
You can restore a configuration by navigating to the
“Resources” tab, double click on a resource name, shows up
it’s “Definition” page. Scroll down on the page and click on
the “(restore configuration)” link, then select a resource
configuration from the drop down list, click on the
“Restore” button, and then click “Save Resource”.
How do I transfer files from one project to another?
You may use Globus file transfer or the following method to transfer files.
If you are a member of a source and target cloud projects then
transferring of files is easy:
Create a small size cluster definition with just one node in the
compute batch. From the resource definition, click on the “Add a
Attached storage” button then add both source and destination
buckets by selecting “Shared Persistent Storages” option from the
drop down list box one at a time. Make sure the bucket’s mount
point names are easily distinguishable, for example /source and
/destination. You do not need a lustre file system in this
cluster. Save the definition.
Start a cluster using the saved definition, and when the cluster is
up, ssh into the controller node.
Change ownership to root to copy all project members files:
sudo-
Use the Linux “cp” recursive command, copy files from the source
contrib and bucket to the target bucket.
By “default instance/vm type” we refer to the instance/vm
types in a pre-created cluster configuration. This
configuration is included when an account is first setup,
and also when creating a new configuration by selecting a
configuration from the “Restore Configuration” link at the
resource definition page.
The Lustre solution on AWS uses their FSx for Lustre service on the
backend. The default deployment type we use is ‘scratch_2’. The
‘persistent’ options are typically aimed at favoring data resilience
over performance, although ‘persistent_3’ does let you specify a
throughput tier. Note that the ‘scratch’ and ‘persistent’ deployment
types in this context are AWS terminology, and are not related to PW’s
definition of ‘persistent’ or ‘ephemeral’ Lustre configurations. You
can choose whatever deployment type you prefer and configure it as
‘persistent’ or ‘ephemeral’ in PW.
scratch_2 FSx file systems are sized in 1.2TB increments, so you’ll
want to set the capacity to ‘2400 GB’ if you stick to the scratch_3
deployment type. The estimated cost of the config JSON shown below is
showing as $0.46 per hour for me. Different deployment types might
have different size increments.
Copy files from a public AWS bucket without authentication keys
You can use the aws CLI on a Cloud cluster by
adding an option to the command that skips authentication. This method should
work for public buckets. It has also worked to copy a file to a personal cluster.
Edit the command as follows:
aws--no-sign-requests3...
# list files[First.Last@abcd8-173~]$aws--no-sign-requests3lss3://noaa-nws-global-pds
PREdata/
PREfix/
2024-11-2216:36:3137683index.html
# copy a file
$aws--no-sign-requests3cps3://noaa-nws-global-pds/index.html./index.html
download:s3://noaa-nws-global-pds/index.htmlto./index.html
We’re in the process of integrating Azure’s own managed Lustre file
system service to the platform, but for now it is deployed similarly
to Googles. This also means that the cost of Lustre on Azure is
significantly higher than it will be on AWS.
On Azure, the usable capacity of the file system will mostly
be determined by the number of OSS nodes you use, and the type of
instances you select. We default to ‘Standard_D64ds_v4’ instances for
Azure Lustre. Regardless of the node size you choose, you will want to
stick to the ‘Standard_D*ds’ line of instances. the ‘ds’ code in
particular indicates that the instance will have an extra scratch disk
on it (used for the fs), and that the disk will be in their premium
tier (likely a faster SSD)
‘Standard_D64ds_v4’ instances should get you about 2.4TB per OSS, so a
single node should get you the capacity you need. However, I can
envision some use cases where it would be more beneficial to have
smaller nodes in greater numbers, so you might want to fine tune this.
The Azure Lustre config below is being estimated at $4.53
How do I restore customization after the default configuration restore?
The Parallel Works default configuration release updates
depend on the changes made to the platform. You can protect
your configuration customization by backing up changes prior
to restoring the default configuration.
From the Parallel Works Platform click on the “Resources”
tab, select the chicklet, and click on the “Duplicate
resource” icon, and create a duplicate configuration.
Use the original configuration for restoring the default
configuration to bring the latest changes. Manually update
customization on the original configuration from the backup
copy.
You can drop the backup copy or hide it from appearing from
the “Compute” dashboard. Hide a resource configuration
option can be found on the “Settings” box on the Resource
definition page.
What is NOAA RDHPCS preferred container solution?
On security issues and capabilities to run the weather model
across the nodes, NOAA’s RDHPC systems chose Singularity as
a platform for users to test and run models within
Containers.
Accessing bucket from a Remote Machine or Cluster’s controller node
Obtain your project’s keys from the PW platform. The project
key can be found by navigating from the PW banner.
Click on the IDE box located on the top right of the page,
navigate to PW/project_keys/gcp/<project key file>.
Double click the project key file, and copy the json
file content.
Write the copied content into a file in
your home directory file. Example:
Write json to ~/project-key.json (or another filename)
Source the credential file in your environment.
source~/.bashrc
Test access
Once these variables are added to your host terminal
environment, you can test gsutils is authenticated by
running the command:
1. Maintain SSH authentication key under account, and use
it in all clusters.
The resource configuration has an “Access Public Key” box,
to store your SSH public key, and the key stored there is
only available in a cluster launched with that
configuration. Instead store your key under “account” ->
“Authentication” tab that automatically populates into your all clusters.
User bootstrap script**
In the resource config page, user bootstrap script pointing
to a folder in contrib fs is a good idea. This helps to
share it in a centralized location and allows other team
members to use it.
Configuration page has a 16k metadata size limitation.
Following these settings can reduce your possibility of a
cluster provisioning error.
An example Singularity Container build, job array that uses bind mounts
This example demonstrates a Singularity container build, and
a job array that uses two bind mounts (input and output
directories ) and creates an output file for each task in
the array.
Below is an example of a job script with a couple sbatch
options that should notify you when a job starts and ends
(you will want to replace the email address with your own of
course):
!/bin/bash
SBATCH-N1
SBATCH--mail-type=ALL
SBATCH--mail-user=<yournoaaemailaddress>
hostname# Optional, this will include the hostname of the# controller noder.
The emails are simple, with only a subject line that looks
something like this:
Slurm Job_id=5 Name=test.sbatch Ended, Run time 00:00:00,
COMPLETED, ExitCode 0
This email may go to your spam folder as it is not domain
validated, that is one downside.
The compute nodes can take several minutes to provision.
These nodes should automatically shut down once they’ve
reached their “Suspend Time”, which defaults to 5 minutes
but can be adjusted. If you submit additional jobs to the
idle nodes before they shut down, the scheduler should
prefer those ones (if they are sufficient for the job) and
the jobs would start a lot quicker. Below is a
list/description of the possible state codes that a slurm
node might have. Bolded the ones that you are most likely to
see while using the cluster:
*:
The node is presently not responding and will not be
allocated any new work. If the node remains non-responsive, it
will be placed in the DOWN state (except in the case of
COMPLETING, DRAINED, DRAINING, FAIL, FAILING nodes).
~:
The node is presently in a power saving mode (typically running at
reduced frequency).
#:
The node is presently being powered up or configured.
%:
The node is presently being powered down.
$:
The node is currently in a reservation with a flag value of
“maintenance”.
@:
The node is pending reboot.
You can manually start with sudoscontrolupdatenodename=<nodename>state=resume
In order to get non-exclusive scheduling to work with Slurm,
you need to reconfigure the scheduler to treat memory as a
“consumable resource”, and then divide the total amount of
available memory on the node by the number of cores.
Since Parallel Works platform doesn’t currently support
automating this, we have to do it manually, so the user
script below only works as is on the two instance types
you’re using on your clusters ( AWS p3dn.24xlarge &
g5.48xlarge). If you decide to use other instance types
the same base script could be used as a template, but the
memory configurations would have to be adjusted.
The script itself looks like this:
#!/bin/bash# configure /mnt/shared/etc/slurm/slurm.conf to add the realmemory to every node
sudosed-i'/NodeName=/ s/$/ RealMemory=763482/'/mnt/shared/etc/slurm/slurm.conf
sudosed-i'/PartitionName=/ s/$/ DefMemPerCPU=15905/'/mnt/shared/etc/slurm/slurm.conf
# configure /etc/slurm/slurm.conf to set memory as a consumable resource
sudosed-i's/SelectTypeParameters=CR_CPU/SelectTypeParameters=CR_CPU_Memory/'/etc/slurm/slurm.conf
exportHOSTNAME="$(hostname)"if[$HOSTNAME==mgmt*]thensudoserviceslurmctldrestart
elsesudoserviceslurmdrestart
fi
How do I change the slurm Suspend time on an active cluster?
You can modify a cluster’s slurm suspend time from the
Resource Definition form prior to starting a cluster.
However if you want to modify the suspend time after a
cluster is started, the commands must be executed by the
owner from the controller node.
You can modify an existing slurm suspend time from the
controller node by running the following commands. In the
following example, the Suspend time is set to 3600 seconds.
In your case, you may want to set it to 60 seconds.
sudosed-i's/SuspendTime=.*/SuspendTime=3600/g'/mnt/shared/etc/slurm/slurm.conf
if[$HOSTNAME==mgmt\*]thensudoscontrolreconfigure
fi
What logs are used to research slurm or node not terminated issues?
The following four log files required to research the root
cause. Please copy the following log files from the
controller node [a.k.a head node] to the project’s permanent
storage and share the location in an OTRS help desk ticket.
In the case, also include the cloud platform name, and the
resource configuration pool name in the ticket description.
These files are owned by root. The cluster owner should
change user as root when copying the files, for example.
$sudosu-root
/var/log/slurm/slurmctld.log:
This is the Slurm control daemon log. It’s useful for scaling
and allocation issues, job-related issues, and any scheduler-related launch
and termination issues.
/var/log/slurm/slurmd.log:
This is the Slurm compute daemon log. It’s useful for
troubleshooting initialization and compute failure related issues.
/var/log/syslog:
Reports global system messages.
/var/log/messages:
Reports system operations.
How do I distribute slurm scripts on different nodes?
By default the slurm sbatch job lands on a single node. You can
distribute the scripts to run on different nodes by using the sbatch--exclusive flag. The easiest solution would probably be to submit
the job with an exclusive option, for example,
A recent modification on the cluster provisioning starts
compute and lustre clusters execution in parallel to speed
up the deployment. Previously this was a sequential step,
and took longer to provision a cluster. Since the compute
cluster comes up earlier than lustre, any user bootstrap
command to copy files to lustre will fail.
For example, this step may fail when included as part of the
user-bootstrap script:
cp-rf/contrib/User.Id/psurge_dev/lustre
You can use the following code snippet as a workaround.
LFS="/lustre"untilmount-tlustre|grep${LFS};doecho"User Bootstrap: lustre not mounted. wait..."sleep10done
cp-rf/contrib/Andrew.Penny/psurge_dev/lustre
What is the command to get max nodes count on a cluster?
Default sinfo output (including a busy node so it shows
outside of the idle list)
Error launching source instance: InvalidParameterValue: User data is
limited to 16384 bytes
Resource configuration page has a 16k metadata size
limitation. Recent feature updates on the configuration page
has reduced the free space available for user data, that
includes SSH public key stored in “Access Public Key”, and
“User Bootstrap”.
Below settings can lower the user data size, and avoid a
provisioning error due to page size limit.
Maintain SSH authentication key under the account, and as it
is shared across all your clusters.
Click on the “User” icon located at the top right of the
page, then navigate to the “account” -> “Authentication”
tab, and your SSH public keys.
Remove the SSH key from the “Access Public Key” box, and
save your configuration.
Where do I enter my public SSH key in the PW platform?
Navigate to your account, the Account -> Authentication,
then click on the “add SSH key” button to your public SSH
Keys. There is a system key “User Workspace”, which is used
by the system to connect from a user’s workspace to your
cluster.
Error “the requested VM size not available in the current region”,
when requesting a non-default compute VM/instance
Each Cloud provider offers a variety of VMs/Instances to
meet the user requirements. The Parallel Works platform’s
default configurations have VM/Instances that are tested for
the peak FV3GFS benchmark performance.
Hence, the current VM/instance quota is for these default
instance types, for example c5n.18xlarge, Standard_HC44rs
and c2-standard-60.
If your application requires a different VM/instance type,
it is advised to open a support case with the required
number of instances, so we can work with the cloud provider
for an a on-demand quota. Depending on the VM/instance type
and count, quota allocation may take a day or up to 2 weeks
depending on the cloud provider.
Bad owner or permissions on /home/User.Name/.ssh/config
This is due to wide permission set to the user container [bastion
node] .ssh folder. Use the command below to reset the permission:
chmod600~/.ssh
What is causing access denied message when trying to access a
project’s cluster?
This message appears if a user account was created after the
cluster was started. The cluster owner can check whether
that user account exists by checking in /etc/passwd file as
below.
$grep-i<user-name>/etc/passwd
Cluster owner can fix the access denied error by restarting
the cluster. When you restart the cluster, a user record
will be added in the /etc/passwd file.
Why is my API script reporting “No cluster found”?
PW made a change on storing the resource pool name
internally in order to prevent naming edge cases where
resources with underscores and without underscores were
treated as the same resource. Underscores will still show up
on the platform if you were using one before, however now
internally the pool name is stored without an underscore and
so some API responses may show different results than
previously.
As a result, any API requests that references the pool name
should now be updated to use the name without underscores.
What is causing the “Permission denied
(publickey,gssapi-keyex,gssapi-with-mic).”?
The message appears in the Resource Monitor log file is:
During a cluster launch process, an ssh tunnel is created
between the controller node and the user container. The user
container is trying to create the tunnel before the host can
accept it, so a few attempts are failed before the host is
ready to accept the request. You may ignore this message.
Also you may also notice an “x” number of failed login
attempts when log in on the controller node. This is from
the failed ssh tunnel attempts.
If the message is getting when trying to access the
controller node from an external network, check if the
public key entered in the configuration is correctly
formatted. You can verify root cause by ssh’ing to the
controller node from the PW’s IDE located at the top right
of the page. Access from IDE uses an internal public and
private key, and therefore you can narrow down the cause.
What is causing the “do not have sufficient capacity for the
requested VM size in this region.”?
You can find error message from the “Logs”, navigate to tab
“scheduler”.
The above message means there is not enough requested
resource in the Azure region. You may attempt a different
region or submit the request later.
You may manually resume the nodes like this:
$ sinfo
Set the nodename and reset the status to “idle” as given
below:
When you query a very large file system, du is trying to read through a lot
of file attributes and metadata in a single run. This can cause du to hang.
First, try breaking your query into smaller chunks,
then run a du based on that result.
You might also specify a mindepth
in the find command. With that set, it won’t try to run du against the top
level directory.
General rule of thumb will pretty much be that any Intel
based instance has HT disabled, and core counts will be
half of the vCPU count advertised for the instance.
Contrib volume is a permanent storage for custom software by
project members. In Google cloud this storage is charged on
the allocated storage, that is 2.5TB and costs about $768.00
per month. If the project does not require this storage, PI
may create a cloud help desk ticket to remove it. Only
Parallel Works Cloud administrator can remove this storage.
Finding the project object storage, [bucket/block storage] and access keys?
From the login page, click on the IDE icon located at the
top right of the page, you will see file manager with
folders.
From the File Manager, navigate under the
“storage/project_keys/<CSP>” folder to locate your project’s
object storage name and access key. The file name is your
project’s bucket name. Open the file by double clicking to
view the bucket access key information.
To access the project’s permanent object storage, copy and
paste the contents from the key file on the controller node,
then execute the CSP commands. For example:-
You may use the Globus Connect or Cloud service provider’s
command line interface to access the object storage.
Transfer files with external object storage from Parallel Works’s cluster
If you have the access credentials of external AWS/Azure/GCP
object storage, you can transfer files. Use the Globus
connector or cloud provider’s command line interface for
file transfer.
Copy a file from the controller node to project permanent storage?
Start a cluster and login into the controller node.
An example use the project cz-c4-id’s secret file.
Your project’s permanent storage file name is the same as
the secret key file name.
Copy and paste the secret key file located at PW’s file
manager storage:storage/project_keys/azure/gfdl-non-cz-c4-id
in the controller node terminal.
Copying a file to Niagara’s untrusted location is done using
a ssh key file. The firewall settings on the GFDL are not
open to allow a file copy.
How do I use GCP gsutil transfer files to a project bucket?
This is not the GFDL GCP tool.
GCP uses the gsutil utility to transfer data into HPC
on-prem system. The “gsutil” command can run either from the
user’s local machine or the RDHPCS systems, such as Niagara.
The gsutil utility is preinstalled on clusters launched
through Parallel Works.
Getting nvhpc NVidia HPC compiler, netcdf, hdf5 packages in my environment?
Parallel Works Platform is installed with Intel processors
and compilers for the FV3GFS performance benchmark test. It
also has all the on-prem libraries [/apps] to provide a
seamless on-prem experience.
The platform offers flexibility to use other processors such
as ARM, and NVIDIA GPU, and install nvhpc compilers to fit
the researchers’ specific experiments.
You can install custom software and create a modified image
[root disk] to use in your experiments. The other option is
to install on your project’s contrib volume and reference
it. Contrib is a permanent storage for your project’s custom
software management. Note that you are responsible for your
custom software stack, although we will try our best to help
you.
Various netcdf and hdf5 packages are available from the yum
repos. yum search netcdf and yum search hdf
Concentrated AWS Availability Zones [AZ] AMD and Intel processors
AMD
hpc6a.48xlarge:
us-east-2b
Intel
c5n.18xlarge:
us-east-1b us-east-1f us-east-2a
c6i.24xlarge:
us-east-1f
c6i.32xlarge:
us-east-2b us-east-1f us-east-2a
What do GCP resource GVNIC and Tier_1 flags represent?
Tier1 is the 100gbps network. GVNIC is a high performance
interconnect that bypasses their virtual interconnect for
better network performance.
Tier 1 bandwidth configuration is only supported on N2, N2D
EPYC Milan, C2 and C2D VMs. Tier 1 bandwidth configuration
is only compatible with VMs that are running the gVNIC
virtual network driver.
Default bandwidth ranges from 10 Gbps to 32 Gbps depending
on the machine family and VM size. Tier 1 bandwidth
increases the maximum egress bandwidth for VMs, and ranges
from 50 Gbps to 100 Gbps depending on the size of your N2,
N2D, C2 or C2D VM.
AMD64 is the name of the architecture, not the cpu platform.
Intel and AMD chips are both “amd64”. Additional reference:
https://en.wikipedia.org/wiki/X86-64
This capability is similar to what has been recently made
available on NOAA HPC systems. Implementation is simply the
installation of the globus-cli tools in /apps for global
availability. Alternately, the user can install the tools
using Anaconda/Miniconda:
However, unlike the on-prem HPC systems, the user will need
to use Globus Connect Personal tool as well. If not already
installed, the user can install it and set up the service to
create an endpoint on that master node by downloading the
tool, untarring it, and running setup:
Container singularity replaced by singularity-ce, and syntax remains the same
When it comes to the software package on the PW platform, it
follows on-prem guidance to provide a consistent user
experience between the environments.
The prior lineage of Singularity was forked twice.
SingularityCE and Apptainer. Singularity has not been
renamed.
Singularity container executable name is same as
singularity, community edition consistent with on-prem
usage.
S3 credentials should be set automatically in your
environment on the cluster, but these credentials are
scoped at a project level, and not to individual users.
What is the best practice to hide credentials, when code is pushed in Github?
Use your programming language command to call out
environment variables. For example in Python: key_value=os.environ['AWS_ACCESS_KEY_ID'].
It is very important not to commit a full print out of the
shell environment.
If you want to keep the repository around between cluster
sessions, working with it from contrib would be the right
choice. If you aren’t doing anything too complex in the repo
(like editing files), or if anything compiling is fairly
small, doing everything from the controller would be fine.
Big compiles would probably be better on a compute node
since you can assign more processors to the build.
What are the GPU models available on AWS, Azure, and GCP
AWS GPUs can be found by typing P3,P4,G3,G4,G5,or G5g
here
Azure GPUs can be found by typing Standard_NC,
Standard_ND, Standard_NV, and Standard_NG
here
GCP GPUs can be found by typing a2. Other GPUs are found to
be unavailable.
What are the Cloud regions supported by Parallel Works?
AWS:
us-east1 and us-east2. Preferred region is us-east-1
Azure:
EastUS and SouthCentralUS. Preferred region is EastUS.
GCP:
regions are us-central1, and us-east-1. Preferred region is us-central1
On Azure, missing /apps fs system or modules not loaded
We are working to fix this bug. If you own the Azure cluster, please
run the command sudo/root/run_ansible. It will take about 2 mins
to complete, and will mount /apps file system.
To load the default CentOS 7 config from the marketplace:
Go to the cluster’s configuration page:
Push the Load From Market button
Select AWS Default Intel FV3 Configuration v.1.0.0 from the dropdown menu,
and click the Restore button. Don’t forget to save your changes!
Manually Manually configure a cluster to use CentOS 7
If you have already made extensive modifications to your cluster’s definition,
you may prefer to revert the required settings by hand without loading a config
from the marketplace. There are two primary settings that need to be configured
to revert back to CentOS 7: The OS image, and the /apps disk snapshot. Keep
in mind that the OS image will need to be set on the controller and every
partition you have configured on the cluster.
The final CentOS 7 PW image is called pw-hpc-c7-x86-64-v31-slurm on every
cloud provider. To configure the controller (login node) to use this image,
find the Image* dropdown under the Controller settings and select the
image. If you have trouble finding it in the list, you can type or copy+paste
the image name into the search bar to locate it. The examples below were taken
from an Azure definition, but the same steps can be done on AWS and GCP as
well.
Follow the same procedure on each of your compute partitions to select the
CentOS 7 image under theElasticImage* dropdown:
The software and modules under /apps were built specifically for their
target operating systems, so the CentOS 7 disk also needs to be selected when
using the old image. This can be done under the Controller Settings by choosing
/apps in the ImageDiskNamesettings, as shown here:
Using legacy Lustre on Azure-Like compute clusters
Legacy Lustre configurations require setting a Lustre server image that matches
the Lustre client version included in CentOS 7 and Rocky 8 based images.
Therefore, it is recommended that your Lustre cluster runs the same base OS as
your compute cluster.
This section only applies to the legacy Lustre implementation on
Azure. AWS FSx for Lustre and Azure Managed Lustre configurations do
not need to be modified.
If you intend to keep your compute clusters on the latest image now running
(Rocky 8), we recommend that you also replace any existing CentOS 7 based
persistent Lustre resources to use Rocky 8 as well. Our suggested method to
do this involves duplicating your existing storage configuration and copying
your data to the new Lustre, either by copying directly from the old storage,
or by syncing it with a bucket. Once you have verified that all of your data
has been migrated, the old filesystem can be shutdown.
If your data is backed
up to a bucket already, you can also re-provision your existing Lustre
configuration and re-sync the data.
Note
Regarding Azure controller instances,
there is a known issue causing Rocky 8 clusters provisioned with certain
instances to fail. As a workaround, we have made the default Rocky 8 cluster
use a Standard_DS3_v2 as the controller, as this machine type is known to work.
This node type is marginally more expensive than the default controller
originally used on CentOS 7 based clusters. A future update will resolve this
issue.
Best practices for file transfers between lustre and object storage bucket?
Use screen or tmux whenever doing a big copy or software build
that is expected to take several hours or days. These tools allow you
to create a login shell that isn’t bound to your specific terminal or
ssh session. That way you can detach and reattach to the shell as
needed.
screen is probably the easiest of the two to work with, especially if you
only need a single window. tmux gets more interesting when you want to run
multiple panes or tabs.
In either case, both of these tools take a little getting used to with the
various keyboard shortcuts to break away from the session. Here are a few
getting started tips:
You can start a single screen session simply by running ‘screen’
To detach from a session, use ctrl+a, and then d. You should see a
message like [detachedfrom80633.pts-0.mgmt-firstlast-gcp-00009]
when you detach.
You can list your screen sessions by running ‘screen -ls’ Ex:
To reattach, use screen-r. It is possible to have multiple screen
sessions at the same time. If you have multiple, you will need to provide
its pid or name when you reattach to it:
$screen-Sscreen1# create a session named 'screen1'[detachedfrom81383.screen1]
$screen-Sscreen2# create a session named 'screen 2'[detachedfrom81452.screen2]
$screen-ls
Therearescreenson:
81452.screen2(Detached)81383.screen1(Detached)2Socketsin/run/screen/S-firstlast.
$screen-rscreen1# reattach to 'screen1' session
To terminate a session, simply log out of it while you are attached. You
will get a message like [screenisterminating] when it exits.
You can certainly save a cluster definition anywhere you want as a JSON file.
To do that, go to the configuration page, click the JSON tab, and copy+paste
everything where you want it to be. That same JSON can then be copied to the
same box under a new cluster definition to configure it the same way. Note
that any attached storages are included in the JSON, so anyone copying the
definition will also need to be able to see those storage resources.
The JSON data includes everything besides the “general settings”, so anyone
using it will still need to set the “resource account” and project before
starting the cluster.
How to publish your own cluster in the Marketplace?
You are also able to publish your own cluster definitions to the marketplace
and share them with anyone else in your group, or even the entire NOAA
platform. Anyone that wants to use it would need to find it in the
marketplace first. Publishing to the marketplace is also a good way to
version control the cluster definitions anyway, so it might be good
for backing up the configuration data somewhere. You can publish resources
to the marketplace from here