Containers
Current Status
Singularity containers are now available to all users and projects on Ursa, Gaea, Hera, MSU-HPC (Orion and Hercules), and PPAN. NOAA Cloud providers, accessed via ParallelWorks, are also supported. In addition to running Singularity containers, users are allowed to build container images on the RDHPCS systems where Apptainer is installed, and upload the images to the RDHPCS container registry deployed at https://registry.rdhpcs.noaa.gov. The same registry can also be used as a spack mirror.
Introduction
Both existing and new NOAA projects aim to build software that is portable across HPC sites and architectures. The RDHPCS program provides the tools and infrastructure needed to support these efforts. One such solution is the use of software containers. Unlike traditional environments based on modules or system-installed libraries, containers encapsulate the full runtime stack. It operates within a shared, multi-user HPC system without requiring elevated privileges.
This chapter describes how to use containers effectively on RDHPCS systems. Topics include obtaining and building container images, using containers for software development, and running applications in batch and MPI-enabled workflows. Particular emphasis is placed on practical usage patterns, such as integrating containers with system schedulers, managing environment variables, and accessing host filesystems.
Containers provide a high degree of portability. However, their correct use in HPC environments requires an understanding of several key concepts, including:
the container execution model
filesystem access through bind mounts
interaction with system-provided Message-Passing Interface (MPI) implementations.
These topics are introduced in the following sections.
Background
A container is a standardized unit of software that packages an application and its dependencies into a self-contained runtime environment. This encapsulation allows applications to run consistently across different systems and improves reproducibility of results.
Containers provide lightweight virtualization by sharing the host system’s OS kernel (typically Linux). This differs from virtual machines (VMs), which rely on hardware emulation and run separate operating systems. This design reduces overhead while maintaining isolation at the application level, as illustrated in the figure below.
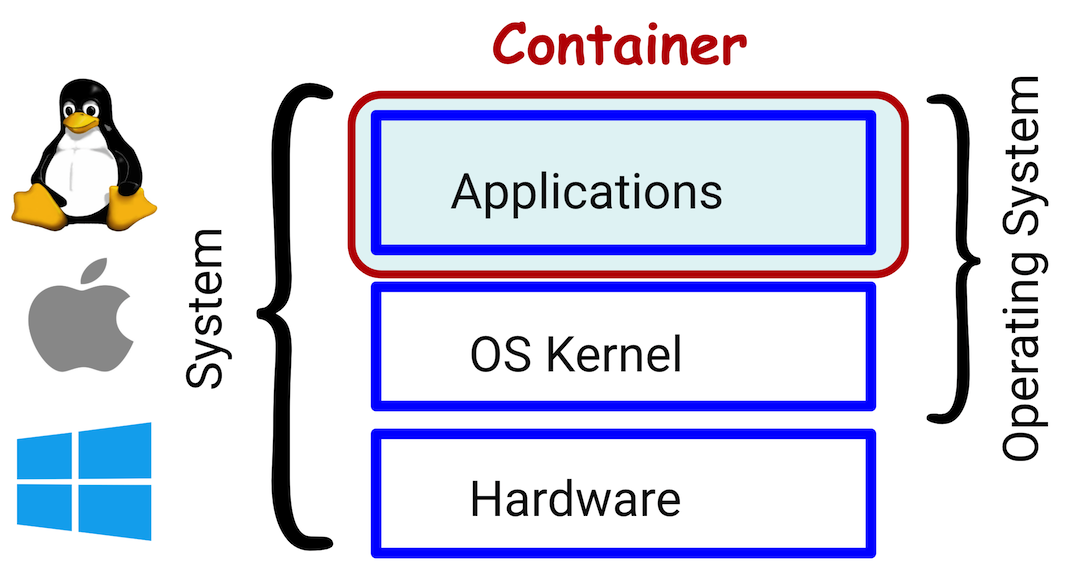
Containers share hardware and OS kernel with the host, and are started as regular processes.
Container environments are typically stored and distributed as image files,
such as .sif (Singularity Image Format). An image contains a complete
filesystem with all required software components and is commonly constructed
from layered components. Container software, such as SingularityCE
or Apptainer, launches these images on the host system to start a
container instance. A container is thus a running instance of an image.
Each container provides its own filesystem while interacting with the host system at runtime, as illustrated in the diagram below.
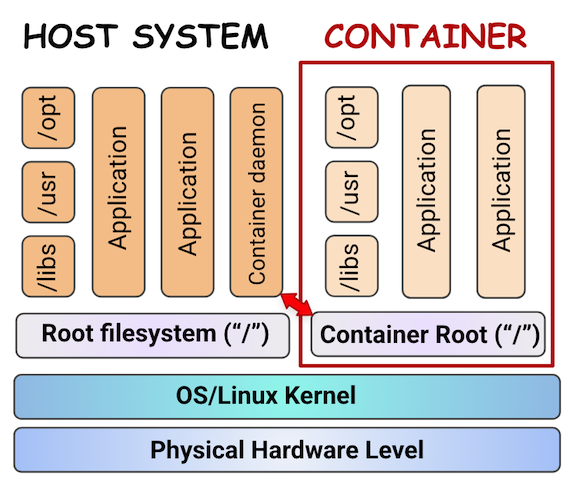
Containers have their own filesystem. They interact with the host at runtime, so the container instance is viewed as a regular running application.
Although containers provide an isolated environment, they rely on the host system for access to filesystems, hardware, and other resources. Host directories can be made available inside the container at runtime through bind mounts. This enables applications to read input data and write output results (see Bind Mounting Host Directories Into a Container).
Effective use of containers in HPC workflows requires understanding how containerized applications interact with the host system. This is particularly true for filesystem access and environment configuration. These aspects are described in the sections that follow.
Supported RDHPCS Container Solutions
The dominant container platform across the enterprise and broader container
ecosystem is Docker. However, Docker is not well
suited to High Performance Computing (HPC) environments. A key limitation is
that Docker typically requires root (or sudo) elevated privileges to
build and run containers. This raises security concerns on shared HPC
systems.
In addition, Docker is designed for microservice-oriented workloads,
where many small, loosely coupled services are deployed. This model does
not align well with large-scale, resource-intensive HPC applications.
To address these needs, alternative technologies have been developed specifically for HPC environments, such as Singularity containers (software ).
In particular, SingularityCE https://sylabs.io/singularity/ and Apptainer (https://apptainer.org/) provide a container model that operates without requiring elevated privileges. Both can integrate with HPC system architecture, batch schedulers, parallel filesystems, and high-performance interconnects.
Both SingularityCE and Apptainer are supported on RDHPCS systems. The table below shows the installed container software on each system and whether module loading is needed.
RDHPCS System |
Container software |
Module to load |
|---|---|---|
Gaea |
|
none required |
Hera |
|
none required |
|
none required |
|
PPAN |
|
none required |
Ursa |
|
none required |
Hercules/Orion |
|
|
|
|
|
NOAA Cloud (PW) |
|
none required |
(*) - The apptainer module on Hercules/Orion is a Spack-managed
install that loads a separate environment, which may not combine well
with other system modules. The apptainer enables certain container
build features
that are otherwise limited in singularity module by security
constraints. The singularity module could further be used for compile
and runtime environments.
Note
Availability of SingularityCE and Apptainer may change as systems are
updated. Use module avail to verify installed versions.
Containers built with either tool are expected to work with the other tool.
SingularityCE can be invoked from the command line using the
singularity command. Apptainer can be invoked with the
apptainer command.
Apptainer provides compatibility with the singularity command,
allowing users to use the same command across RDHPCS systems. Differences
primarily relate to configuration defaults and installation details, but
generally do not affect typical user workflows.
Singularity Containers
Singularity was introduced in 2015 as a container solution designed specifically for HPC environments (see Singularity/Apptainer history). It focuses on security, portability, and integration with existing system architectures. Unlike Docker, Singularity allows users to run containers without elevated privileges, making it suitable for shared, multi-user systems.
In 2021, the project transitioned to a community-driven model under the Linux Foundation and continued as Apptainer. In parallel, SingularityCE (Community Edition) continued development under separate stewardship. Both projects retain a common design and are widely used across HPC systems.
Further information is available at:
Docker: https://www.docker.com/
Docker Documentation: https://docs.docker.com/
SingularityCE: https://sylabs.io/singularity/
SingularityCE Documentation: https://docs.sylabs.io/ https://docs.sylabs.io/guides/latest/user-guide/
Apptainer: https://apptainer.org/
Apptainer Documentation: https://apptainer.org/docs/ https://apptainer.org/docs/user/latest/
Container User Identity
Both SingularityCE and Apptainer are designed for shared HPC environments.
They follow a non-root execution model that preserves the invoking
user’s identity inside the container. Processes run with the same
UID/GID as on the host, so permissions, access controls, and
resource limits are enforced consistently. As a result, no additional
privileges are granted beyond those already held on the host. Limited
features, such as --fakeroot, can explicitly enable additional
privileges for development purposes.
Host directories must be explicitly made accessible inside the container
(for example, through bind mounts). This applies to applications that
need read/write access. This ensures consistent behavior within standard
HPC security policies.
Differences Between SingularityCE and Apptainer
One important difference between SingularityCE and Apptainer is their default privilege model. SingularityCE commonly uses a setuid-root helper program to perform selected container setup operations, such as mount and namespace setup. The containerized application itself runs as the invoking user. Apptainer is non-setuid by default in current versions and normally uses unprivileged user namespaces for rootless execution.
Container build support is site- and installation-dependent for both runtimes.
Regular users can commonly pull or convert images from Docker/OCI registries
into .sif images. Building containers from definition files without
sudo privileges usually requires fakeroot support, user namespace support,
and appropriate users’ UID/GID mappings. Apptainer often provides a more
convenient rootless build workflow, but it is not unlimited. It remains
subject to operating system support, filesystem constraints, and local
HPC security policy.
Usage Considerations and Security Responsibilities
Many HPC applications are designed to run in parallel across multiple CPUs and often multiple nodes for scalable performance. Communication and coordination between the tasks in such applications are handled using Message Passing Interface (MPI). MPI is a standardized framework for exchanging messages across CPUs and nodes in distributed-memory systems. Different approaches for MPI integration in container runtime environments are described in Section MPI Integration Models. Users should evaluate the available approaches and select the one that best fits their application and workflow requirements.
As with any source code, users are responsible for downloading container images only from reputable sources. Users must also ensure that images, whether downloaded or self-created, comply with the NOAA RDHPCS security policy. Finally, users should fully understand the contents of a container image before running it on RDHPC systems.
Obtaining and Building Container Images
There are several ways to obtain or build container images using
SingularityCE or Apptainer. These include pulling images from existing
repositories or creating them locally. Some methods are available to regular
users, while others require superuser (sudo/root) privileges when using
SingularityCE. For security reasons, some build capabilities are
restricted on NOAA RDHPC systems where SingularityCE is installed. Users can
build their own images on other platforms where Apptainer is available.
For additional details, refer to the SingularityCE Documentation, Apptainer documentation, or Docker documentation. Existing Docker images can be converted to Singularity images and then run on NOAA RDHPC systems.
Pull and Convert Docker Images to Singularity Format
Pull an image from DockerHub or another Open Container Initiative (OCI) registry. This command downloads a prebuilt container image and converts it to Singularity Image Format (.sif). Root privileges are not required.
The examples below show how to pull three kinds of images:
the latest Rocky Linux 9 image
a generic DockerHub image, using the
myrepo/myimage:tagnaming formata custom named image from the NOAA-EPIC Docker repository
The NOAA-EPIC image is used later in this chapter for workflow examples (see Container Execution Workflows).
singularity pull image.sif docker://rockylinux:9
singularity pull myimage.sif docker://myrepo/myimage:tag
singularity pull rocky9-gnu13-ompi416.sif docker://noaaepic/rocky9-gnu:13.3.1-ompi416
Note
Some platforms, such as Ursa, may require allocating a service node to
pull or build a container with additional memory requirements. To create
a local container rocky9-gnu13-ompi416.sif, for example, the
allocation request could look as follows:
salloc -N 1 -p u1-service -A <project> -t 30:00 --mem=16G
Replace <project> with your project account.
Build from a Docker Container
singularity build image.sif docker://rockylinux:9
singularity build image.sif docker://myrepo/myimage:tag
The pull command performs a simple conversion from Docker/OCI images
to .sif format. The build command provides more general
functionality and additional options. Both produce a .sif image
file, but would not be bit-for-bit identical when converting
Docker/OCI layers.
To ensure that files and directories are accessible to all users, the
--fix-perms option can be used. It mitigates permission mismatches
between build-time root and run-time users by adjusting restrictive
permissions from Docker layers or package installations.
It effectively prevents runtime issues, such as Permission denied
errors when accessing files. It also ensures non-root users can execute
binaries inside the container.
singularity build --fix-perms rocky9-gnu13-ompi416.sif docker://noaaepic/rocky9-gnu:13.3.1-ompi416
Build a Writable Sandbox Container
When additional development of a container is needed, a writable sandbox may be created. The sandbox appears as a directory on the host filesystem, representing the container’s root filesystem. It can be built from either a remote repository or an existing local image:
singularity build --sandbox  sandbox_dir/ docker://rockylinux:9
singularity build --sandbox  sandbox_dir/ image.sif
singularity build --sandbox --fix-perms sandbox_dir/ docker://rockylinux:9
When the sandbox is built without the --fix-perms option (first two
command lines), builds may create files with restrictive permissions.
These files cannot be removed with rm without adjusting user’s
permissions first. Note the prompt warnings that
indicate how to address these issues, such as:
Warning
Building a sandbox creates a directory structure under ./sandbox_dir,
with further nested bin/, etc/, usr/, var/, and other
container directories. This emulates a filesystem in user space. Note,
however, that it does not give sudo/root privileges inside the
container. The container filesystem can be accessed as other users’
directories. It is not compressed, taking more disk space than the
container image.
In contrast, a .sif image file has a filesystem in a compressed,
read-only SquashFS format that efficiently stores files.
When a container image is launched in Apptainer runtime, it is mounted
using the Filesystem in Userspace (FUSE) tool, squashfuse. This
allows filesystems to run in user space without sudo/root privileges.
For a default setuid mode in SingularityCE runtime, the SquashFS
partition is mounted using kernel filesystem drivers
(squashfs, not FUSE). However, running SingularityCE
in the alternative/rootless mode implements FUSE mount with
squashfuse, when kernel mounts are not permitted.
No runtime mount is needed for a sandbox container, which is already mounted during build time. It has a directory structure integrated with the host filesystem. This allows for faster execution and could be helpful for development and debugging.
When using sandbox for shelling-in or running that requires writing into
the directory, use --writable option during launch, for example:
singularity shell --writable [-B dir_host:dir_container] sandbox_dir/
The -B option is used to bind mount host directories into the
container. See Bind Mounting Host Directories Into a Container.
Build a Writable Sandbox for Development (Fakeroot)
Note
The --fakeroot option is supported by Apptainer. In SingularityCE,
--fakeroot support is installation-dependent and may require
administrator configuration of user namespaces and subordinate UID/GID
mappings. If --fakeroot is not available, building or modifying a
writable sandbox with SingularityCE may require elevated sudo or
root privileges.
The --fakeroot option allows building a sandbox container with
emulated root privileges inside the container namespace. This enables
installation and modification steps that require elevated access,
while the user remains unprivileged on the host system. It is
particularly useful for iterative container development and debugging.
apptainer build --sandbox --fakeroot sandbox_dir docker://rockylinux:9
Build an Image from the Existing Sandbox
A container image can also be created from the existing sandbox. If
you used the sandbox for any development, it is recommended to convert
it to a .sif image. This is especially useful for production runs
and batch jobs.
singularity build --fix-perms image2.sif sandbox_dir/
Build a Container from a Definition File
A definition file describes how to build a container image. The following basic example builds a Rocky Linux 9 SIF image and can be adapted for either SingularityCE or Apptainer.
Building from a definition file may require elevated privileges or site
configuration, especially with SingularityCE. Apptainer often supports
unprivileged builds more directly, but availability depends on the local
installation. You may want to use --fix-perms and --fakeroot options.
singularity build [--fix-perms] [--fakeroot] simple-rocky9.sif simple-rocky9.def
An example definition file, simple-rocky9.def, is shown below:
Bootstrap: docker
From: rockylinux:9

%labels
   Author Your Name
   Version v1.0
   Description Rocky Linux 9 example container

%runscript
   echo "Hello from Rocky Linux 9 example container"
   cat /etc/os-release
Run the resulting image with:
singularity run simple-rocky9.sif
It will print the message from the runscript and display the contents of
/etc/os-release inside the container.
Users may need to specify the full path to the container image
and bind-mount host directories into it. This is described in the
Bind Mounting Host Directories Into a Container section.
Build/Pull a Container for Different Architecture
The u1-gh exploratory partition on Ursa contains 8 Grace Hopper compute
nodes, which are equipped with Arm-based 72-core NVIDIA Grace CPU’s. To run
containers on Grace Hopper nodes, images have to be built or pulled for ARM64
architecture. Because the compute nodes are air-gapped, users can not
build/pull images directly on the Grace Hopper nodes. Instead, users have to
use login nodes to build/pull images targeting ARM architecture using the
--arch flag.
singularity build --arch arm64 <container_arm.sif> <container.def>
singularity pull --arch arm64 <container_arm.sif> <container-url>
Runtime Model
The most commonly used container commands are:
singularity pull ...    # convert a remote image to a local .sif file
singularity build ...   # build an image or sandbox
singularity shell ...   # open an interactive shell inside a container (exit with ``exit``)
singularity run ...     # run a container using its default runscript
singularity exec ...    # execute a specific command or application in a container
Detailed command usage is available via the built-in help system:
singularity --help
singularity exec --help
Apptainer provides the same command interface and supports the
singularity command for compatibility on most systems by legacy reasons.
However, use of the apptainer command is recommended on systems with
Apptainer. This ensures consistency with environment variable naming
(for example, APPTAINERENV_*) and avoids ambiguity when configuring or
debugging runtime behavior.
In simple examples below we omit binding host directories into the container for simplicity. In practice, it is often necessary; see Bind Mounting Host Directories Into a Container for details.
Running Containers
Containers can be executed directly using the container runtime. The
run command starts the container and executes its default runscript.
See the earlier container run example for running
a container image built from a definition file. Test running another container
image built in earlier examples from the Docker image:
singularity run image.sif
The resulting action will be shelling into the container as marked by
Apptainer> or Singularity> prompt. Exiting the container shell
returns to the host environment.
Use exec to execute a different command directly
(Executing Applications in Containers).
Note
In HPC environments, container images and sandbox directories are
typically specified using absolute paths (for example,
/work/.../image.sif or /scratch/.../sandbox_dir). This ensures
that the container is accessible on all compute nodes, particularly
in batch jobs and multi-node runs. The examples in this chapter may
omit full paths for brevity.
Additional arguments can be provided after the image name. These arguments
are passed to the container’s runscript, as in the generic example
with a custom myimage.sif below:
singularity run myimage.sif input.dat output.dat
If the container defines a runscript such as:
#!/bin/bash
echo "Running application with arguments:"
echo "$@"
my_application "$@"
then the arguments are accessible within the runscript via $@, and are
forwarded to the application. The output would be:
Running application with arguments:
input.dat output.dat
Actual testing examples for running containers with arguments are given in the section for Container Execution Workflows.
Interactive Shell in Containers
To interactively explore or debug a container environment, use the
shell command:
singularity shell image.sif
This opens an interactive shell inside the container. Commands run
within the container environment, but still execute as processes on the
host system. The container provides its own filesystem rooted at /
(the root directory), with a standard Linux directory layout (for
example, /bin, /usr, /etc, /home). Some host directories
may also be visible if bind-mounted (see Bind Mounting Host
Directories Into a Container).
If write access is required (for example, for sandbox containers), use:
singularity shell --writable sandbox_dir/
Executing Applications in Containers
To execute a specific command or binary inside a container, use the
exec command as in the generic example below:
singularity exec myimage.sif my_application
This is the most common method for running applications in batch jobs and scripts. The specified command is executed directly within the container environment, without invoking the container’s runscript.
Multiple commands can be executed by invoking a shell:
singularity exec myimage.sif bash -c "command1 && command2"
In more complex workflows, a sequence of commands can be executed within the container. This is done by invoking a shell and running a short command script. This is commonly used to initialize the runtime environment, load modules, and compile applications. See examples with command scripts in section Container Execution Workflows.
The container exits automatically once the command sequence completes. Availability of modules inside the container depends on whether the module system (for example, Lmod) is installed in the container. Modules may also be made available from the host environment.
Note
The -H (or --home) option can be used to override the home
directory inside the container. By default, the container uses the
user’s host $HOME directory.
This option may be useful to isolate configuration or cache files, or when the default home directory is not writable. For example:
singularity exec -H /scratch/$USER image.sif my_application
The specified directory /scratch/$USER is then used as $HOME
inside the container.
For parallel execution using MPI, see MPI Integration Models for Containers.
Environment Variable Propagation
Container runtimes such as SingularityCE and Apptainer inherit environment variables from the host system at runtime. By default, most variables defined in the user’s shell are available inside the container.
Environment variables inside the container may originate from the host, the container image, or values explicitly passed at runtime. The resulting environment is a combination of these sources, with precedence determined by the runtime configuration. Environment variables can also be overridden or explicitly set at runtime, as described in the following sections.
Passing Environment Variables into Containers
Environment variables can be explicitly passed into a container at runtime. This is commonly used to configure application behavior, control library settings, or provide runtime parameters without modifying the container image. This approach is particularly useful for passing runtime configuration variables (for example, MPI, network, or I/O settings) into the container.
In SingularityCE, environment variables are passed into the container by
prefixing them with SINGULARITYENV_. In Apptainer, the equivalent
mechanism uses the APPTAINERENV_ prefix. For example:
export APPTAINERENV_MY_VAR=value
apptainer exec image.sif env | grep MY_VAR
Inside the container, the variable is available as:
MY_VAR=value
On systems where Apptainer is used, the APPTAINERENV_ prefix is
recommended to ensure consistent behavior. The SINGULARITYENV_ prefix
may still be supported for compatibility, particularly when using the
singularity command.
Note
Variables set with APPTAINERENV_ or SINGULARITYENV_ override
variables defined inside the container image.
Overriding the Environment
The -e option (equivalent to --cleanenv) prevents most host
environment variables from being propagated into the container. This is
useful for reducing unintended interactions with the host environment.
Comparing the output of the following two commands illustrates the effect
of the -e option:
export MY_HOST_VAR=value
apptainer exec image.sif env | grep MY_HOST_VAR

apptainer exec -e image.sif env | grep MY_HOST_VAR
The first command shows MY_HOST_VAR exported earlier in the host environment; the second will not.
To pass a variable while using a clean environment and --env:
apptainer exec -e --env MY_VAR=value image.sif env | grep MY_VAR
Using Environment Files
For workflows that require multiple environment variables, an environment file can be used:
apptainer exec --env-file my_env.list image.sif my_application
Where my_env.list contains:
VAR1=value1
VAR2=value2
This approach is particularly useful in batch jobs and reproducible workflows.
Environment Variables for MPI in HPC Workflows
In HPC workflows, environment variables are often used to configure MPI behavior, communication libraries, and network settings. These variables can be passed into the container in the same way. For example:
export APPTAINERENV_FI_PROVIDER=tcp
export APPTAINERENV_OMPI_MCA_pml=ob1
export APPTAINERENV_OMP_NUM_THREADS=1
apptainer exec image.sif my_mpi_application
Inside the container, these variables are available as:
FI_PROVIDER=tcp
OMPI_MCA_pml=ob1
OMP_NUM_THREADS=1
This approach is commonly used to control communication backends, threading behavior, and performance tuning parameters without modifying the container image.
Environment Variable Considerations
Environment variables play an important role in configuring application behavior, including compiler settings, library paths, MPI configuration, and hardware-specific options.
Users should be aware that:
variables defined on the host may override container defaults
missing or incorrect variables can lead to runtime failures
MPI and communication libraries often rely on environment variables for correct operation
Careful management of environment variables is therefore essential for reliable and reproducible container execution in HPC workflows.
Bind Mounting Host Directories Into a Container
A container normally sees only its own filesystem, plus a limited set of
host paths mounted automatically by the runtime.
To make additional host
directories visible inside the container, use bind mounts. A bind mount
maps a directory on the host to a directory inside the container. This
allows the application to read input files, write output, and access
shared project or scratch filesystems. This is especially important
on HPC systems, where user data usually lives outside the container
image. Examples include /home, /work, /scratch, /lustre,
/gpfs, /local. These bind mounts are listed in the command line
using the -B flag.
If more than one directory needs to be bound, each one must be listed
with its own -B flag.
singularity shell -B /work image.sif
singularity shell -B /scratch3 -B /scratch4 image.sif
Some host directories needed at container runtime
may have the same name as native container directories. Host directories
could then be mounted with a different name for container runtime use.
The renaming approach is as following: -B dir_host:dir_container.
singularity build -B /local -B /work -B /apps:/apps2 image.sif
singularity exec -B /local -B /work -B /apps:/apps2 image.sif
In this case, the host’s /work and /local filesystems are mounted
under the same name. However, the host’s /apps becomes /apps2
inside the runtime container. Most of the time, only top-level
directories (filesystems) need to be listed to create a mount point
inside the container.
The following table lists the typical bind directories for a number of NOAA
RDHPC Tier 1 platforms. These paths are to be entered each with its -B
flag. The directories usually include:
a local filesystem hosting the work directory
any temporary space used for building containers
non-standard filesystems for home directories
additional filesystems that may host input data or output results
The list is not exhaustive. Users should consult the system documentation for additional bind mount points that specific applications or workflows may require.
Machine |
Main bind directory |
Additional bind directory |
|---|---|---|
Derecho |
|
none |
Hera/Ursa |
|
|
Gaea-C6 |
|
|
Hercules / Orion |
|
|
NOAA Cloud (AWS/Azure) |
|
|
MPI Integration Models
Running MPI applications in containers requires coordination between the container runtime, the MPI implementation, and the system scheduler. SingularityCE and Apptainer support several MPI integration models in HPC environments.
Hybrid MPI Model (Host + Container MPI)
This is the most common and recommended approach.
The MPI launcher (for example, mpirun or scheduler launchers such as
srun) is executed on the host system. It starts ranks across
compute nodes. Each rank then launches a container instance, resulting
in one container per MPI task. MPI communication uses the host system’s
communication stack (for example, OFI/libfabric, UCX, TCP).
A key requirement is that the container’s MPI library is compatible with the host MPI at the binary (ABI) level. Application Binary Interface (ABI) defines how compiled programs and libraries interact, including function calls, data types, symbol names, system calls, and linking.
Compatibility requirements depend on the launch method:
- Host MPI launcher (``mpirun``, ``mpiexec``)
Requires MPI ABI compatibility between container and host (for example, matching Open MPI major versions or compatible Intel/OneAPI MPI ).
- Scheduler launcher (``srun``)
Requires compatibility with the host Process Management Interface (PMI) or PMIx, which provides process mapping and initialization information for MPI.
Warning
Mismatched MPI implementations or versions may result in runtime failures, hangs, or incorrect behavior.
Host MPI Only (Bind) Model
In this model, the container does not include an MPI implementation. Instead, the application dynamically links against MPI libraries provided by the host system.
The MPI launcher runs on the host, and required libraries are made available inside the container through bind mounts.
Key requirements:
The application must be compiled against an MPI ABI-compatible interface
Host MPI, fabric, and vendor libraries must be visible inside the container (via bind mounts)
Required environment variables (for example,
LD_LIBRARY_PATH,PMI_*,PMIX_*) and fabric settings (for example,FI_*,UCX_*) must be propagated
Advantages include smaller container images and access to optimized vendor MPI implementations. However, this approach reduces portability and requires careful configuration of the runtime environment.
Fully Containerized MPI Model
In this model, the MPI stack is entirely contained within the image. The container includes:
MPI implementation (for example, Open MPI, MPICH, or Intel MPI)
MPI launcher (
mpirun,mpiexec), with no intentional reliance on host MPI installations.All required dependencies
Advantages:
High portability and reproducibility
Self-contained execution environment
Limitations:
Multi-node support is possible but depends on correct interaction with host scheduler, MPI implementation, and PMI/PMIx services
May require additional configuration for network fabrics (InfiniBand, etc.) and/or shared-memory transports
Typically less robust for large-scale, multi-node HPC workloads and may be sensitive to system-specific configuration
In practice, the hybrid MPI model provides the best balance of performance, portability, and integration with HPC systems. It is generally recommended for production workflows.
Container Execution Workflows
The examples in this section use the container image built earlier from
the NOAA-EPIC Docker repository, rocky9-gnu13-ompi416.sif. See
Pull and Convert Docker Images to Singularity Format
or Build from a Docker Container with –fix-perms. The image contains an mpi-tests
directory with simple Fortran test programs. These illustrate different
workflows and MPI integration models.
The examples demonstrate building and running a Fortran application
inside a Singularity/Apptainer container. This includes serial
execution, and MPI execution on a single node or across multiple nodes.
These examples have been tested on the following RDHPC systems:
Ursa, Hera, MSU Hercules/Orion, Gaea c5/c6, NOAA Cloud AWS/Azure.
The directory can be copied to the user’s space, using bind mount
directories (-B) as required by the target system:
singularity exec [-B /host_dir] rocky9-gnu13-ompi416.sif \
    cp -r /opt/mpi-tests .
cd ./mpi-tests
The directory contains:
README.md– a description of the examples and instructions for building and running the tests.hello-world.f90– a simple serial Fortran test program.hello-world-parallel.f90– an MPI hello-world test program.Makefile– builds both test executables.job_compile.sh– batch script for building the executables.job_script.sh– batch script for running the MPI test on two nodes, with or without command-line arguments.
The hello-world.f90 program is a minimal serial test: it prints a
single “Hello, World!” message and exits, without using MPI at all.
It runs as one process no matter how many ranks or nodes are requested.
It doesn’t verify anything about the MPI runtime, only that the
compiler toolchain and container can build and run a basic executable.
The hello-world-parallel.f90 program is a minimal MPI application.
It initializes MPI with mpi_init, then retrieves each process’s
rank and the total number of ranks (mpi_comm_rank and
mpi_comm_size). The output contains a greeting from every rank, for
example “Hello, World! I am process 3 of 8”. If command-line arguments
are passed to the executable, each rank also reports how many it
received and lists them, as shown in the
Passing Arguments example below. It then
shuts down cleanly with mpi_finalize.
The examples below assume a Slurm scheduler, with MPI ranks launched
using srun. They also assume a working directory under /lustre,
matching the NOAA AWS Cloud environment. Other systems may require
changes to the Slurm directives, bind paths, base directory, container
image path, and MPI runtime environment.
Compiling an Application With a Container
Containers can also be used to provide a consistent build environment
for compiling applications. The Makefile in the example directory
builds both hello-world and hello-world-parallel using
mpif90. The executables can be built using one of the following methods.
Option A: build with the Makefile, from an interactive shell. Start
a shell inside the container. Add -B /lustre or
-B /path/to/bind/mount to the command line if needed,
and define the image path for your environment:
export img="/lustre/rocky9-gnu13-ompi416.sif"
singularity shell -B /lustre "${img}"
After the Singularity or Apptainer prompt appears, indicating a successful shell session, initialize the module environment. Load the compiler/MPI environment as follows:
source /usr/share/lmod/lmod/init/bash
module use /opt/modulefiles
module load gnu openmpi
module list
Proceed to the test directory staged locally and build the executables
using the Makefile:
cd /lustre/mpi-tests
make clean
make
Option B: build manually with mpif90. While shelled into the
container from Option A, the executables can also be built without the
Makefile, using mpif90 directly:
make clean
mpif90 -o hello-world-parallel hello-world-parallel.f90
mpif90 -o hello-world hello-world.f90
After successful compilation, exit the container shell with exit
and return to the host environment.
Option C: build with a batch script. Alternatively, the build can
run non-interactively in a batch job, as shown in job_compile.sh
below. This example requests one node with one task and four CPU
cores, which make -j uses to build in parallel.
Before submitting, the following adaptations of the script are needed
for your host system:
SBATCHdirectives for the Slurm job scheduler (at the very least, account, qos, and partition);base_dir– your base directory with a container image and locally staged mpi-tests directory;Load a singularity or apptainer module if required;
For Apptainer, set the corresponding
APPTAINERenvironment variables and replacesingularitywithapptainer;The bind directory (or directories) following the
-Bflag.
#!/bin/sh
#SBATCH -e err
#SBATCH -o out
#SBATCH --account=epic
#SBATCH --qos=batch
##SBATCH --partition=<partition>
#SBATCH --nodes=1
#SBATCH --ntasks-per-node=1
#SBATCH --cpus-per-task=4
#SBATCH --time=00:00:30
#SBATCH --job-name="hello-world-compile"

base_dir="/lustre"
img="${base_dir}/rocky9-gnu13-ompi416.sif"
cd ${base_dir}/mpi-tests

singularity exec -B /lustre ${img} bash -c '
   source /usr/share/lmod/lmod/init/bash
   module use /opt/modulefiles
   module load gnu openmpi
   module list
   make clean
   make -j "${SLURM_CPUS_PER_TASK}"
   '
Submit the batch compile job with the standard Slurm command:
sbatch job_compile.sh
Only one container process is started by the job scheduler; make
creates the parallel build jobs (four, matching --cpus-per-task)
inside that container. This differs from running an MPI application,
where a separate container instance is started for each MPI rank.
Running a Serial Application
Applications that do not use MPI can be executed interactively inside a container, or launched directly from the host environment. This simple execution model is commonly used for preprocessing, postprocessing, testing, or building applications.
After building hello-world with any method from
Compiling an Application With a Container, you can run it either from an
interactive shell inside the container, or directly from the host
environment using the exec command.
From an interactive shell, as in Compiling an Application With a Container, Option A:
source /usr/share/lmod/lmod/init/bash
module use /opt/modulefiles
module load gnu openmpi
cd /lustre/mpi-tests
./hello-world
Directly from the host, without opening an interactive shell:
singularity exec -B /lustre "${img}" bash -c '
   source /usr/share/lmod/lmod/init/bash
   module use /opt/modulefiles
   module load gnu openmpi
   cd /lustre/mpi-tests
   ./hello-world
'
This runs a single process without invoking MPI. It can be used
interactively or within a batch job, typically without requiring
scheduler launchers (for example, srun).
Running an MPI Application
For production HPC jobs, the host scheduler and host MPI launcher remain responsible for process placement, rank launch, and network integration. Each rank then launches a container instance and executes the application inside the container. This is often referred to as a Hybrid MPI Model (see Hybrid MPI Model). This approach works equally well for a single node or across multiple nodes.
On Slurm systems, users can check which MPI launch plugins are available on the host system with:
srun --mpi=list
The output is system dependent, but may include options such as
pmi2, pmix, or other site-supported MPI launch interfaces.
The example below assumes that Slurm launches ranks through its PMI2
interface, and that the Open MPI stack inside the container was built
with PMI2 support.
The batch script job_script.sh submits a two-node Slurm job that
runs hello-world-parallel. By default, it runs the executable
without arguments:
#!/bin/bash
#SBATCH -e err
#SBATCH -o out
#SBATCH --account=epic
#SBATCH --qos=batch
##SBATCH --partition=<partition>
#SBATCH --nodes=2
#SBATCH --ntasks-per-node=8
#SBATCH --time=00:00:30
#SBATCH --job-name="hello-world-parallel"

base_dir="/lustre"
img="${base_dir}/rocky9-gnu13-ompi416.sif"
cd ${base_dir}/mpi-tests

nprocs=${SLURM_NTASKS}
nnodes=${SLURM_NNODES}
ntpn=${SLURM_NTASKS_PER_NODE}

# module load singularity # module load apptainer
export SINGULARITY_SHELL=/bin/bash
export SINGULARITYENV_OMPI_MCA_btl="^openib"
export SINGULARITYENV_OMPI_MCA_btl_vader_single_copy_mechanism=none

srun --mpi=pmi2 -n ${nprocs} \
        singularity exec -B /lustre  ${img} \
        bash -c '
        source /usr/share/lmod/lmod/init/bash
        module use /opt/modulefiles
        module load gnu openmpi
        ./hello-world-parallel '
# Running with arguments: replace the line above with the following
# two lines (uncomment them)
#        ./hello-world-parallel "$1" "$2" "$3"
#        ' bash "${nprocs}" "${nnodes}" "${ntpn}"
Several environment variables are defined that start with
SINGULARITY or SINGULARITYENV_* (use APPTAINER_* or
APPTAINERENV_* for the Apptainer software). They are set to
coordinate with the host environment and network fabric provider.
These particular variables ensure this example works successfully on
the NOAA RDHPC systems tested (Ursa, Hera, Gaea, MSU Hercules/Orion,
and NOAA Cloud AWS/Azure).
Adapt batch script to your environment as in Option C: build with a batch script, before submitting it to the job scheduler:
sbatch job_script.sh
By default, the script runs the executable without arguments, so the
out file should contain a simple greeting from each rank, similar
to:
Hello, World! I am process           8 of          16
Hello, World! I am process           9 of          16
Hello, World! I am process           0 of          16
Hello, World! I am process          10 of          16
Hello, World! I am process           1 of          16
Hello, World! I am process          11 of          16
Hello, World! I am process           4 of          16
Hello, World! I am process          12 of          16
Hello, World! I am process           5 of          16
Hello, World! I am process          14 of          16
Hello, World! I am process           3 of          16
Hello, World! I am process          15 of          16
Hello, World! I am process           2 of          16
Hello, World! I am process          13 of          16
Hello, World! I am process           7 of          16
Hello, World! I am process           6 of          16
The rank order may vary between runs.
The same batch script works for a single node; set --nodes=1 in the
SBATCH directives instead.
Passing Arguments to the MPI Application
To pass three values derived from Slurm (nprocs, nnodes, and
ntpn) to hello-world-parallel, uncomment the optional argument
block already present at the end of job_script.sh, replacing the
line
./hello-world-parallel ''
with the following:
./hello-world-parallel "$1" "$2" "$3"
' bash "${nprocs}" "${nnodes}" "${ntpn}"
Submit the modified script the same way. The output should be similar to the previous example, but each rank also reports the command-line arguments it received:
Number of arguments:           3
Arguments provided:
Argument           1 :16
Argument           2 :2
Argument           3 :8
Hello, World! I am process           4 of          16
Testing on a Single Node with Containerized MPI
For quick testing on a single node, mpirun can instead be invoked
inside the container, using the container’s own MPI stack rather than
the host launcher. This corresponds to the
Fully Containerized MPI Model.
Start an interactive shell as in Compiling an Application With a
Container, Option A, then run:
source /usr/share/lmod/lmod/init/bash
module use /opt/modulefiles
module load gnu openmpi
cd /lustre/mpi-tests
mpirun -n 8 ./hello-world-parallel
This approach is not recommended for production or multi-node jobs:
it does not have full integration with the host job scheduler, since
mpirun runs entirely inside the container using its MPI libraries
rather than through Slurm. It can, however, be helpful for debugging an
MPI application on a single node before running it through the
Hybrid MPI Model described above.
Container help, questions, and guidance
The complexities involving containers, particularly MPI and containers, can make containers difficult to use. RDHPCS system administrators and help staff have limited knowledge on using containers on HPC systems. Open a help request to obtain what help can be offered. In practice, your fellow scientists and the container community will likely know your specific Singularity image or application better.
Note
The general examples in this chapter have been tested on most NOAA RDHPC platforms. These include Hera, Ursa, Gaea, Orion/Hercules, and NOAA AWS/Azure (via ParallelWorks). Testing used the container software available on each platform. Some examples, such as building a sandbox container and opening a shell inside it, may require bind-mounting corresponding host filesystems. This ensures that the expected mount-point directories are available inside the sandbox. It helps avoid errors or warnings when entering the container.
In contrast, examples for more complex workflows are intended as templates for user-specific use cases. These include batch scripts that launch containers to compile and/or run applications. These examples should be edited to match the target platform, scheduler directives, filesystem layout, container image, application, and site-specific environment.