Contributing to these docs
Overview
This site, docs.rdhpcs.noaa.gov, is the single source for RDHPCS user documentation. Source files are kept in the NOAA-RDHPCS GitHub repository, written in reStructuredText (RST), and rendered into HTML by Sphinx. Automated checks validate markup syntax, links, and style on every pull request.
Before contributing, review CONTRIBUTING.md in the repository root. It covers the Code of Conduct, issue and pull request guidelines, commit message format, source directory structure, and code style requirements that apply to all contributions.
Submitting suggestions
Have a suggestion but don’t want to edit files directly? Open an issue on GitHub to start the conversation.
If you need a GitHub account, follow these steps.
Contributing changes via the browser
The quickest way to contribute is through the GitHub web interface, which requires no local tooling. Watch the webcast tutorial (log into your NOAA Google account first) for a walk-through of the full browser-based workflow.
Note
The browser-based editors can’t build or preview the rendered documentation. The automated checks catch markup errors after you submit a pull request, but you won’t see the final HTML output beforehand. Use the command-line workflow if you want to preview your changes locally before submitting.
Fork the repository.
Go to https://github.com/NOAA-RDHPCS/noaa-rdhpcs.github.io and click the Fork button in the upper-right corner. Select your account and click Create fork.

Navigate to the file you want to edit in your fork and open an editor.
Two browser-based editors are available:
Simple editor — navigate to the file you want to edit, then click the pencil icon (Edit this file) in the upper-right corner of the file view. Best for single-file changes.
github.dev — press
.(period) while viewing the repository or a file to open a Visual Studio Code-style editor in the browser. Use this for changes that span multiple files.
Create a new branch for your changes.
Note
Always create a new branch rather than committing directly to
main. This keeps your default branch clean and lets you have multiple contributions open at once.Simple editor: Branch creation happens at commit time in step 5 below — no action needed here.
github.dev: Click the branch name in the bottom status bar, type a short descriptive branch name in the box that appears, and click Create new branch.
Edit the file.
Make your changes in the editor. The simple editor has a Preview tab, but it renders raw RST — not the final built HTML.
Commit your changes.
Simple editor: Scroll to the top and click Commit changes. Enter a commit message, select Create a new branch for this commit, give the branch a short descriptive name, and click Propose changes.
github.dev: Click the Source Control icon in the left sidebar (or press
Ctrl+Shift+G). Click + next to each changed file to stage it, enter a commit message, and click Commit & Push.Open a pull request.
After proposing changes in the simple editor, GitHub takes you directly to the Open a pull request page. In github.dev, click the pull request icon at the top of the Source Control sidebar.
Fill in a descriptive title and description. Reference your issue using
#<issue number>. Click Create pull request.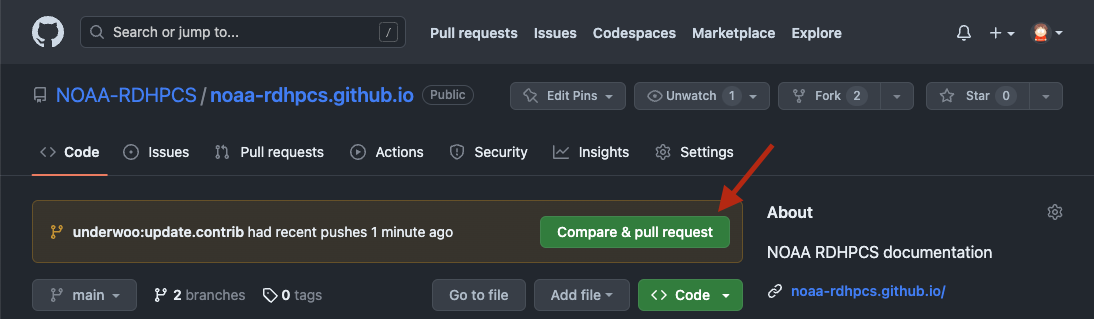
Work with the reviewers to refine the update as needed.
To set up a local authoring environment instead, continue reading below. The following sections cover the full command-line workflow: setting up your environment, building and validating the docs, and submitting changes via a pull request.
Set up your authoring environment
The steps below require Python 3 to be installed on your system.
Fork the documentation repository on GitHub.
Go to https://github.com/NOAA-RDHPCS/noaa-rdhpcs.github.io and click the Fork button in the upper-right corner.
Clone your fork locally.
$ git clone https://github.com/<your-github-id>/noaa-rdhpcs.github.io.git
$ cd noaa-rdhpcs.github.io
Add the upstream remote and track it.
$ git remote add upstream https://github.com/NOAA-RDHPCS/noaa-rdhpcs.github.io.git
$ git fetch upstream
$ git branch --set-upstream-to=upstream/main
This links your local
mainbranch to the official repository so thatgit pull(with no arguments) always fetches the latest changes from upstream.Create and activate a Python virtual environment.
$ python3 -m venv .venv
$ source .venv/bin/activate
On Windows use
.venv\Scripts\activateinstead.You only need to create the virtual environment once. In future terminal sessions, reactivate it before running any
makeorpipcommands.$ source .venv/bin/activate
Install Sphinx and the required packages.
$ pip install -r requirements.txt
See requirements.txt for the full list of packages.
Build and validate
After setup, use these commands from the repository root. All must complete with zero errors and zero warnings before you commit or submit a pull request.
- Build HTML
$ make html
- Preview
Start a local web server.
$ python3 -m http.server 8080 --directory build/html
Open
http://localhost:8080. PressCtrl+Cto stop.- Check links
$ make linkcheck
- Lint markup
$ make lint
Edit and submit
After your environment is set up, follow these steps for each contribution.
Update your local clone from upstream.
$ git checkout main
$ git pull upstream main
Create a new branch for your changes.
$ git checkout -b my-edits-branch
Make your edits to the relevant
.rstfiles.Keep one logical change per branch — don’t bundle unrelated edits. See CONTRIBUTING.md for guidance on which directories to edit and which to avoid.
Rebuild and preview your changes (see Build and validate above).
Stage and commit your changes.
$ git add <file1.rst> <file2.rst>
$ git commit -m "Add scp transfer to data page"
Replace
<file1.rst> <file2.rst>with the actual filenames you changed.Write commit messages in the imperative mood with a subject line of 50 characters or fewer. Add a body if the reason for the change is not obvious. Reference the related issue with
#<issue number>. See CONTRIBUTING.md for the full commit message guidelines.Push your branch to your fork.
$ git push -u origin my-edits-branch
The
-uflag links your local branch to the remote so that future pushes on this branch only needgit push.Open a pull request on GitHub.
After pushing, GitHub displays a prompt to open a pull request.
Include a description of your changes and reference any related issues. The automated checks must pass before the PR can be merged.
Work with the reviewers to refine the update as needed.
GitHub guidelines
When you want to work on an issue, assign it to yourself if no one is assigned yet. If someone is already assigned, check in with them about collaborating.
Reference the issue(s) your pull request (PR) addresses using GitHub’s
#notation.Use
WIPin your PR title to indicate it’s not ready to merge. Remove it when you’re ready for review.If specific individuals should be aware of your changes, suggest them as reviewers on the PR.
You don’t need to assign labels to your PR. The team may adjust them.