Data Transfers
Overview
RDHPCS provides several methods to transfer data to and from RDHPCS systems. Each method has advantages and disadvantages or limitations. Users should pick the approach that best suits their needs based on the information provided here.
For security reasons, access to most external hosts or sites (including your laptop/desktop) is blocked, and access is opened up on an as-needed basis. Sites that have been allowed access are referred to as trusted hosts and all other sites/hosts will be considered “untrusted” sites/hosts.
See Requests for Firewall Exceptions for details if you need access to or from a machine that is currently considered as an “untrusted” host/site.
Data Transfer Methods
Globus Connect Service is a utility system, Web or CLI-based, for efficient data transfer between DTNs and external storage systems. Where Globus endpoints are available, it is the recommended method for high-speed transfer. Note that some sites outside the RDHPCS program do not support Globus.
Data Transfer Nodes (DTNs) are dedicated systems deployed and configured specifically for data transfers, providing fast methods for data transfer. DTNs can only be used within RDHPCS, and transfers are limited to High-Performance File Systems (HPFS).
Untrusted Data Transfer Nodes (UDTNs). Nodes available from anywhere on the Internet, to support transfers in and out of the RDHPCS program to external sites. Globus, or typical data transfer commands, can be used for transfer to and from UDTNs.
Port Tunnelling. SSH tunnels can be created from a point of login to any remote host. Once a tunnel has been created, you can use the tunnels for data transfers, even from “untrusted hosts”. This method is available when other choices are not available or optimal.
Globus
Globus Connect Service is available on all RDHPCS systems (Ursa, Mercury, PPAN, Gaea, Orion, and Hercules) and we encourage its use over other methods whenever possible. Globus Connect Service is used to transfer data between Globus endpoints. A Globus endpoint is a file transfer location (computer/server) accessible to Globus. To transfer data, use your browser to connect to the Globus App, authenticate to each endpoint, then navigate to the desired directory, select the file(s)/directory(s) to be transferred, and initiate the transfer. The movement of data will be managed and supervised in the background. You may close the browser or leave the browser open. The current status of your request is displayed if you need it. When the transfer is complete, you will be notified by email. Please see Globus Online Data Transfer for complete details.
Some use cases that involve sites outside the RDHPCS program may not support Globus. In these cases, you can use the other methods described below.
Data Transfer Nodes (DTNs)
We highly recommend using this method to transfer data when available, as it provides a fast method for transferring TO and FROM HPC Systems - Ursa, Mercury, Gaea, and Orion. Please see the Transferring Data page for complete details.
Note the following:
DTNs can only be used between NOAA RDHPCS systems. For transfers involving systems outside the NOAA RDHPCS, see the UDTN section below.
DTNs can typically only access the High-Performance Filesystems (HPFS-scratch file systems), not the /home filesystems. This is a HPC site-specific configuration.
Unattended data transfers can only be done using the DTNs.
If you are unable to use the DTNs, please review the other available options.
Untrusted Data Transfer Nodes (UDTNs)
Untrusted DTNs (UDTNs) are accessible from anywhere on the internet. They are designed to allow data to be transferred in and out of the RDHPCS program from external (non-NOAA HPC) sites – Cloud providers, Universities, for example. UDTNs only access the following directories on the host system:
/*/data_untrusted/$USER
For occasional transfers to/from untrusted hosts, you can use two stage copying to copy data from an remote host to an RDHPCS host.
Untrusted DTNs can only be used for inbound connections. The connection cannot be started on the DTNs, but data can flow in either direction. Typically, users should be able to log in to the remote system and initiate a transfer from the remote machine.
Note
Before you use the UDTN for data transfers, you MUST have logged into the appropriate host for the necessary directories to appear - including your /home.
Please see Transferring Data for complete details.
Port Tunnelling
In the SSH port tunnel method, an SSH tunnel is created between your point of login (typically your desktop) to the remote host (typically Ursa, Hera or other remote hosts). The port tunnel method works from any system on the network (that is, your local machine does not necessarily have to be in the noaa.gov domain). We recommend using this method when the options above are not available or are not optimal for your use case. Please see the Transferring Data page for complete details.
Requests for Firewall Exceptions
For security reasons, access to/from all external sites is controlled by a Firewall and most external sites are blocked and allowed to connect only through an exception to the Firewall rules. Please see the Transferring Data page for complete details.
Firewall Exception Terms
Data Transfer Method: scp, sftp, rsync, globus, wget, curl, “globus”
Local Machine: Where you will be logged in when initiating the transfer
Remote Machine: The other machine that will be involved in the transfer.
Note
If you need to access an external site on a routine basis for your work, you will need to request a Firewall Exception. Submit a helpdesk ticket with the subject line: Firewall Exception request and provide the information requested below.
Justification: Some information about why this is needed
Data Transfer Method: The utility that will be used for doing data transfer
Local Machine: DNS name, IP address (or endpoint for Globus)
Remote Machine: DNS name, IP address (or endpoint for Globus)
Sample command: A typical transfer command
Note
If you have a globus endpoint, please provide it, as that would be the preferred method for data transfers.
Note
Using Globus, you can have a third party transfer where both the ends of a transfer are remote.
Transferring Data
Globus Connect Service (GCS) is now available on RDHPCS systems, and we encourage its use over any other method whenever possible. Some use cases that involve sites outside the RDHPCS program that may not support Globus may still use other methods described in this document.
Many users are accustomed to using scp/sftp via service (same as login) nodes. However, we would like to point out that Data Transfer Nodes (DTN’s) provides a much faster method for transferring data to and from HPC systems (Ursa/Mercury/Gaea/WCOSS/Orion), so we highly recommend DTNs over service nodes.
Much data on RDHPCS servers are protected by confidentiality agreements, may be sensitive, or are otherwise proprietary. Our obligation includes the enforcement of all policies that make curating such data even possible. This involves maintaining tight security that adheres to NOAA OCIO guidelines. We also recognize the need for sharing data with collaborators who may not be vetted by us to ensure that NOAA/DOC standards are met. The so-called untrusted DTN was created so that less secure channels may be open for the smooth transfer of data essential for projects to conduct their research.
The following section is common for most operating systems and exceptions are noted.
Only the High-Performance Filesystems (the scratch filesystems) are available, not your /home filesystem. When you are asked for a password, authenticate to the system using YubiKey MFA. All RDHPCS systems require an initial login before you can access your directories from the DTNs/uDTNs. This is because the directory structure gets set up only on the first login to login nodes on the host.
Globus Connect
Details and examples are available in the Globus Online Data Transfer section.
Trusted Data Transfer Nodes (DTN)
By default, trusted Data Transfer Nodes are only accessible from some hosts within noaa.gov (and Orion). If you need access to/from a host that is not accessible, we will need to modify system firewalls. See Firewall Modification Requests for DTNs for directions.
DTNs support ssh-based authentication transfer methods, which currently include scp, rsync, and sftp. Default authentication uses your NOAA name and password, and YubiKey Multi-Factor Authentication.
Note
If you’re using WinSCP on Windows, choose SFTP as the protocol rather than SCP.
Site |
Fully Qualified Host Name |
|---|---|
Mercury |
dtn-mercury.fairmont.rdhpcs.noaa.gov |
Ursa |
dtn-ursa.fairmont.rdhpcs.noaa.gov |
Orion |
orion-dtn.hpc.msstate.edu |
Hercules |
hercules-dtn.hpc.msstate.edu |
See the RDHPCS Globus Collection Summary for complete information.
Untrusted Data Transfer Nodes (UDTN)
Untrusted DTNs (UDTNs) are open systems that are accessible from anywhere, including your personal machine. It is possible to do data transfers from most external sites including your local desktop/laptop. However, note the following important points:
Before you can use the UDTNs for data transfers on any of the clusters (Mercury, Ursa, PPAN, etc.), you must login at least once to set up the necessary directories.
File space on the UDTNs is very limited. So it is important to move to your project space as soon as possible and clean up temporary files. Failure to comply with this policy will force us to remove your data and disable your access to this directory.
You can use Globus Online Data Transfer to transfer data to/from the UDTNs. Details and examples are available in the Globus Online Data Transfer section
Using “globus flows” may be a good way to accomplish two-step transfers since most of the time the data has to be moved off the destination!
Note
If you’re using WinSCP on Windows, choose SFTP as the protocol rather than SCP.
Unattended data transfers are only allowed on the Trusted DTN’s, and not allowed on any of the Untrusted DTNs.
All files under your allocated directories which have not been accessed in the last 5 days will be automatically purged!!!
You don’t have access to all of the file systems on the respective systems. Instead, you are only able access the temporary directories specific to the system mentioned in the table below:
Host |
Globus Collection |
Hostname for scp, sftp, etc. |
Directory on Host |
Directory as seen on the uDTN |
|---|---|---|---|---|
Mercury |
noaardhpcs#mercury_untrusted |
udtn-mercury.fairmont.rdhpcs.noaa.gov |
|
|
Ursa |
noaardhpcs#ursa_untrusted |
udtn-ursa.fairmont.rdhpcs.noaa.gov |
|
|
Gaea C5/F5 |
noaardhpcs#gaea |
N/A |
|
|
Gaea C6/F6 |
noaardhpcs#gaea_f6 |
N/A |
|
|
Orion |
msuhpc2#orion-dtn |
orion-dtn.hpc.msstate.edu |
|
|
Hercules |
msuhpc2#hercules |
hercules-dtn.HPC.MsState.Edu |
|
|
PPAN |
noaardhpcs#ppan_untrusted |
N/A |
|
Hint
On Mercury and Ursa, the Directory on the host differs from the Directory as seen on the uDTN. The final column in the table above shows the data path on a DTN/uDTN, if it differs from the native path on the system.
Please note that your project directories are not directly accessible from some of the uDTNs, so a two-step transfer is generally required to move data to/from project directories. The steps below show how to transfer a file from a remote location to your project space on the RDHPCS systems, and you do the steps in reverse order to move the file in the opposite direction:
Transfer to the data_untrusted tree above using the uDTN.
Move/copy to the allocated project space.
The Globus Flows may be useful here in setting up automated 2-step transfers.
Transfer and Syntax Examples
Note
Username is case sensitive in the scp command. For example, the username should be in the form First.Last, rather than first.last. Replace dtn-<name>.<site>.rdhpcs.noaa.gov with the correct host name listed above.
scp /path/to/local/file First.Last@dtn-<name>.<site>.rdhpcs.noaa.gov:/path/on/HPC/System
First.Last@dtn-<name>.<site>.rdhpcs.noaa.gov's password:
(This is the point where you enter your YubiKey Token response)
Globus transfer from an external endpoint to the GFDL untrusted endpoint
This example transfers a file named ‘myDataFileName_here.txt’ from ‘my-personal-endpoint-id’ to the untrusted GFDL endpoint, ‘6ba73d87-08f2-463e-bf8f-83cc3e7a871f’. The data string ‘6ba73d87-08f2-463e-bf8f-83cc3e7a871f’ is the actual Globus ID of the GFDL untrusted endpoint.
To issue the command, replace First.Last in the example with your own credentials.
[First.Last@an001 ~]$ globus transfer my-personal-external-endpoint-id:myDataFileName_here.txt \
6ba73d87-08f2-463e-bf8f-83cc3e7a871f:First.Last/myDataFileName_there.txt
Firewall Modification Requests for DTNs
By default, only hosts in the noaa.gov domain are able to access the DTNs. If you need to transfer data using the DTNs from hosts that are not within the noaa.gov domain, you must submit a request to open the firewall. Please provide the following information:
Summary/Justification for transfer: Why do you need this and for how long (permanent or temporary - specify timeframe if temporary)?
Source Systems (DNS name): dtn-ursa.fairmont.rdhpcs.noaa.gov, dtn-hera.fairmont.rdhpcs.noaa.gov, dtn-mercury.fairmont.rdhpcs.noaa.gov
Source IPs: See below for dtn IPs
Destination Systems (DNS name):
Destination IPs: Use the “host” command to find IPs, see below
Destination Port name (s): Service name (dns, http, nfs, bluearc-admin)
Destination Port number (s) or range:
Destination Port protocol (tcp/udp):
Direction: Which way is the connection being initiated? To NOAA RDHPCS Systems (inbound) or out from NOAA RDHPCS Systems (outbound)?
An example command: Please include a typical command to show how you will be doing the data transfers
dtn-ursa.fairmont.rdhpcs.noaa.gov = 140.208.202.[4-5]
dtn-mercury.fairmont.rdhpcs.noaa.gov = 140.208.202.[76-77]
Use the “host” command to find IPs
First.Last@hfe04$ host ruc.noaa.gov
ruc.noaa.gov has address 140.172.12.92
Example
Summary/Justification for transfer: Requesting (permanent) wget access to pull data from ruc.noaa.gov via the Ursa DTNs to transfer weather data to NOAA R&D systems.
Source Systems (DNS name): dtn-ursa.fairmont.rdhpcs.noaa.gov, dtn-mercury.fairmont.rdhpcs.noaa.gov
Source IPs: 140.208.202.[4-5], 140.208.171.[1-4], 140.208.202.[76-77]
Destination Systems: ruc.noaa.gov
Destination IPs: 140.172.12.92
Destination Port name (s): HTTP/HTTPS, SSH
Destination Port number (s) or range: 80, 22,443
Destination Port protocol (tcp/udp): tcp
Direction: Outbound
An example command:
wget -r -A "a-deck-ecmwf-wmo*" https://ruc.noaa.gov/hfip/fiorino/tc/ecmwf/2019/wmo/
Once the information is reviewed and approved by the security team you will be able to do your data transfers. Please plan ahead for firewall requests, review by the security team can take up to two weeks, not including troubleshooting implementation issues.
Unattended Data Transfers or Password-less Transfers to/from RDHPCs Systems
For real-time experiments that require data to be transferred automatically, we support unattended data transfers from @noaa.gov hosts and other trusted hosts. The actual data flow can be in either direction, but the connection must be initiated from the remote host.
Note
Unattended data transfers are only allowed on the Trusted DTNs.
Important
Unattended data transfers to Gaea can only be completed using Globus App, or another method that can authenticate using an X509 certificate, e.g., gsiscp or globus-url-copy.
This capability is intended mainly for projects that can demonstrate a need where unattended data transfer is required. If you need this capability, answer the following questions and follow the steps below:
What command will you be using to do the transfers?
What is the name of the machine where you’ll be running the transfer command? In the instructions below we will refer to this as the Remote Host.
What is the name of the NOAA-RDHPCS machine that you’re trying to access? We will refer to this as RDHPCS-HOST.
Copy the ~/.ssh/id_rsa.pub from the remote host above and place it on the RDHPCS-HOST in the directory:
~/scp-pubkeys/.On the RDHPCS-HOST, rename this file so that is is clear where it came from. For example, if Remote Host was “tide”, you can rename the file as follows:
$ mv ~/scp-pubkeys/id_rsa.pub ~/scp-pubkeys/id_rsa.pub-tide
Once this is done, send a help request with subject line Request for unattended data transfer capability” Include the following information:
Your username on the RDHPCS-HOST.
The full path of the file containing the key from Remote Host.
The IP address of the Remote Host
Note
Do not put keys in your home .ssh directory. Put them in
$HOME/scp-pubkeys directory on RDHPCS-HOST.
WCOSS2 Users Only
The public key directory on WCOSS2 is /u/sshKeys/$USER. You don’t
have to provide the IP addresses when you fill out the information
requested.
If you do not have an RSA key on the remote system (that is, if you do not have an id_rsa.pub file in your $HOME/.ssh directory) you can generate it with (at least on Linux) with the command:
# ssh-keygen -t rsa
Warning
When you are prompted for a Passphrase, simply press <Enter>. Otherwise you will be prompted for “Passphrase” even if you are set up for unattended data transfers and will defeat the purpose!
If you have difficulties, contact the support staff for help.
Using a Pre-Established SSH Port Tunnel
With the SSH port tunnel method, an SSH tunnel is created between your point of login (typically your desktop) to the remote host (typically Ursa, Hera or another remote host). The port tunnel method will work from any system on the network (that is, your local machine does not necessarily have to be in the noaa.gov domain). We recommend using this in cases where DTN is not accessible.
SSH Port Tunnel from Linux-like systems
This method requires two sessions on your local machine: one to establish the SSH port tunnel, and the other to actually perform the copy. To establish the port tunnel, you will need to get the appropriate bastion hostname (CAC or RSA) for the host you need from the Bastion Hostnames table.
Before You Begin
Only the first session to a bastion can establish an ssh tunnel. You will know that you already have an existing session when you see messages like
-------------------
bind [127.0.0.1]:57037: Address already in use
channel_setup_fwd_listener_tcpip: cannot listen to port: 57037
Could not request local forwarding.
-------------------
To establish a new tunnel, do one of the following:
Close any existing sessions
Open a new session using a bastion where you have no existing sessions.
In the steps below, replace First.Last with your own HPC username, and XXXXX with the unique Local Port Number assigned to you when you log in to your specified HPC system. Use the word “localhost” where indicated. It is not a variable, don’t substitute anything else. Before you perform the first step, close all current sessions on the HPC where system you are trying to connect. Once the first session has been opened with port forwarding, any further connections (login via ssh, copy via scp) will work as expected. You are running these commands on your local machine, not within the HPC system terminal.
As long as this ssh window remains open, you will be able to use this forwarded port for data transfers. After the first session has been opened with the port forwarding, any further connections (login via ssh, copy via scp) will work as expected.
1. Find your local port number
To find your unique local port number, log onto your specified HPC system (Ursa/Hera). Make a note of this number - once you’ve recorded it, close all sessions. Note that this number will be different on Hera and Ursa.

Note
Open two terminal windows for this process
Local Client Window #1
Enter the appropriate command for your environment. Remember to replace XXXXX with the local port number identified in Step 1 or as needed.
For Windows Power Shell, enter:
ssh -m hmac-sha2-512-etm@openssh.com -LXXXXX:localhost:XXXXX First.Last@ursa-mfa.fairmont.rdhpcs.noaa.gov
For Mac or Linux, enter:
ssh -LXXXX:localhost:XXXXX First.Last@ursa-mfa.fairmont.rdhpcs.noaa.gov
If you will be running X11 applications with x2go or normal terminals, remember to add the -X parameter as follows:
ssh -X -LXXXXX:localhost:XXXXX First.Last@ursa-mfa.fairmont.rdhpcs.noaa.gov
Note that objects emphasized in this figure should be unique to your configuration:

Verify that the tunnel is working by doing the following in another local window from your local machine:
ssh -p <port> First.Last@localhost
Note that <port> is your local port number used above, First.Last is your user ID on the RDHPCS systems and localhost is typed as-is.
You should be prompted for your password; enter your PIN + RSA token and you should be able to login. Once you are able to log in, you can log out of that session as that was only for testing the tunnel.
2. Use SCP to Complete the Transfer
Local Client Window #2
Once the session is open, you can use this forwarded port for data transfers, as long as this ssh window is kept open. After the first session has been opened with the port forwarding, any further connections (login via ssh, copy via scp) will work as expected.
Remember that this is the second terminal session opened on your local machine. Once a tunnel has been set up as in Step 1, you can use a client such as WinSCP to do the transfers using that tunnel. Please keep in mind that tunnel will exist only as long as the session opened in Step 1 is kept alive.
Hostname: localhost
Port: your-assigned-port-used-in-Step1-above
File protocol: SFTP
To transfer a file to HPC Systems
For Windows Power Shell, enter:
scp -P XXXXX /local/path/to/file First.Last@localhost:/path/to/file/on/HPCSystems
For Mac or Linux, enter:
rsync <put rsync options here> -e 'ssh -l First.Last -p XXXXX' /local/path/to/files First.Last@localhost:/path/to/files/on/HPCSystems
Note
Your username is case sensitive when used in the scp command. Username should be in the form of First.Last.
To transfer a file from HPC Systems:
For Windows Power Shell, enter:
scp -P XXXXX First.Last@localhost:/path/to/file/on/HPCSystems /local/path/to/file
For Mac or Linux, enter:
rsync <put rsync options here> -e 'ssh -l First.Last -p XXXXX' First.Last@localhost:/path/to/files/on/HPCSystems /local/path/to/files
In either case, you will be asked for a password. Touch your YubiKey for authentication.
SSH Port Tunnel For PuTTY-CAC Windows Systems
PuTTY-CAC is an SSH client, used to configure and initiate connection. As needed, install PuTTY-CAC. If you cannot install software on your machine, contact your local systems administrator.
Configuration
Enter host information to configure an SSH Terminal Session.

1. Enter Username In the left pane under Connection, select “Data” and enter your NOAA user name as it appears in your NOAA email address. (Ex: Robin.Lee if your NOAA email is Robin.Lee@noaa.gov). User name is case sensitive - First.Last. If you do not create a username, you will have to enter your user name each time your open a session.

Complete the configuration:
Select “Session” from the top of the left pane.
Select “Save” (between Load and Delete).
Open a First System Session
Open the session to make sure it’s working, and to record your Local Port number to complete the Port Tunneling setup.
Select the configured session from the “Saved Sessions” list. Select Load, then Open.
Enter your unique RSA Passcode.
The RSA passcode is your RSA token PIN followed by 8 digits displayed on your RSA token. The digits must be on display when you press enter, or access will be denied. When you open a new SSH session, wait for the RSA token code to refresh before you enter it.
Find and record your Local Host number.
Click Exit, or close the PuTTY-CAC window to end the session.
Port Tunnel Setup
To enable data transfers, you will need to set up a Port Tunnel.
Open PuTTY-CAC.
Select the session from the Saved Sessions list, then Load.
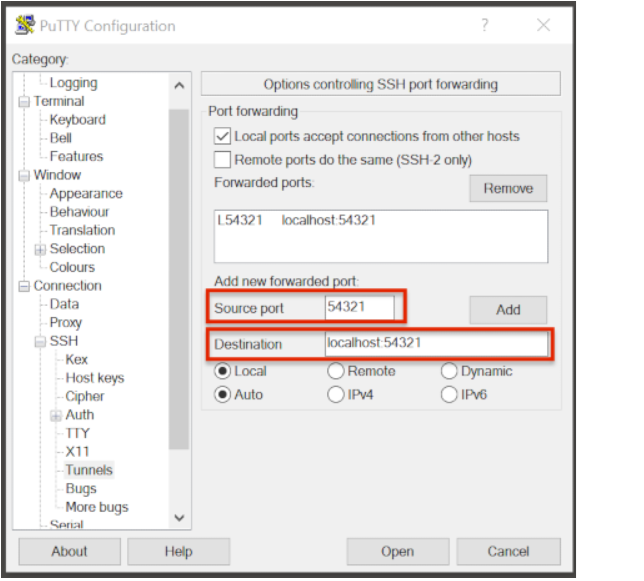
In the left pane under Connection>SSH select Tunnels.
Check Local ports accept connections from other hosts.
In the Source Port field, enter your Local Port number
In the Destination Port field, enter “localhost:<local port number>”, where your local port number matches what was entered in the Source port.
Select Local and Auto Radio Buttons.
Click the Add Button.
To save the configuration change:
In the left pane, select Session.
Select Save.
Select Open to Login and verify that the updated session works correctly.
Create a new Port Tunnel for each SSH system you intend to use. Each one will have a unique Local Port number.
To add extra saved sessions (ex: for another Bastion) for the same system (you already have the Local Port number):
Load your current saved session
Enter the new host name for the other Bastion
Give the new session a new name (ex: Hera- Princeton)
Select Save. The new session will appear in the list of saved sessions.
Select Open to Login and verify the new session works correctly.
WinSCP
Note
You must have a port tunnel established before you can use WinSCP. Configure the port forwarding for WinSCP using the method that matches your system configuration.
Note
The port-forwarded session must remain active to maintain a connection to WinSCP. Use the word “localhost” where indicated. It is not a variable, don’t substitute with anything else.
Once port forwarding is configured, open and configure WinSCP. Please be sure to select SFTP as the file protocol.

When prompted for a password, enter your RSA PIN + RSA Token:

External Data Transfers (applies to NESCC – Ursa and Mercury only)
Internally Initiated Transfers
HPC systems do not have specific hosts for internally initiated transfers. Transfers initiated from HPC Systems use the front end nodes or nodes in the service partition for doing the transfers.
The firewall rules are set up by default to block all outgoing traffic. However, we permit internally initiated transfers by request, after the request is reviewed and approved by the security team. If you need this capability, send an email to the Help System that contains your request. Use the subject line: <$SYSTEM> FEs to <$HOSTNAME> with the appropriate system and hostname.
Ursa:
Source Systems:  ufe[1-16].fairmont.rdhpcs.noaa.gov
Source IPs:  140.208.193.[131-146]
Hera:
Source Systems:  hfe[1-12].fairmont.rdhpcs.noaa.gov
Source IPs:  140.208.193.[1-12]
Mercury
Source Systems:  mfe[01-04].fairmont.rdhpcs.noaa.gov
Source IPs: 140.208.193.[101-104]
Include the following information in the request:
Justification
Source Systems
Source IPs
Destination Systems
Destination IPs
Destination Port name (s): Service name (dns, http, nfs, bluearc-admin)
Destination Port number (s) or range:
Destination Port protocol (tcp/udp):
Example command: Please include a typical command to show how you will be doing the data transfers
Example
Subject: Ursa FEs to podaac-tools.jpl.nasa.gov
Justification: Requesting (permanent) wget access to pull data from podaac-tools.jpl.nasa.gov via the Ursa front ends to transfer weather data to NOAA.
Source Systems: hfe[01-12].fairmont.rdhpcs.noaa.gov, mfe[1-4].fairmont.rdhpcs.noaa.gov
Source IPs: 140.208.193.[1-12], 140.208.193.[101-104]
Destination Systems: podaac-tools.jpl.nasa.gov
Destination IPs: 128.149.132.160
Destination Port name (s): HTTP/HTTPS, SSH
Destination Port number (s) or range: 80, 22,443
Destination Port protocol (tcp/udp): tcp
Direction: Outbound
An example command:
``wget -r  -A.nc  https://podaac-tools.jpl.nasa.gov/measures-drive/files/mur_sst/tmchin/seasonal``

``--2019-05-13  15:34:09--https://podaac-tools.jpl.nasa.gov/measures-drive/files/mur_sst/tmchin/seasonal``
Tuning Hosts to Improve Data Transfer Rates
The standard tuning parameters for network settings are not optimal for high-latency transfers, which means any transfers to and from Ursa unless you are in West Virginia. These settings are specific to where you are, and the latency between your system and Ursa. A good place to start is to change the settings on your local host to match:
net.core.rmem_max=16777216
net.core.wmem_max=16777216
net.ipv4.tcp_rmem=4096 87380 16777216
net.ipv4.tcp_wmem=4096 65536 16777216
A good reference for how to tune your host can be found here.
Additional tuning can be done depending on where your system is located, the type of network interface your host has, and many other options. Please work with your local network administrators to help tune your local hosts to maximize network performance.
Globus Online Data Transfer
Globus is the preferred and most efficient way to transfer data between DTNs and external storage systems. To use this service, you must have a NOAA login name and a working RSA SecureID token. You can invoke Globus functions either through a web interface or from a command line interface (CLI).
Click here to access Globus Documentation. Click here to review the Globus Tutorial.
Overview
An endpoint is a file transfer location (computer/server) accessible to Globus. A collection is a server with a related access method to files. Untrusted collections can transfer data to and from anywhere. Trusted collections can transfer data to and from other vetted collections. When you log into Globus and click Collections, you can see what collections are shared with you, and also those that you share with others. Globus lets you navigate through collections to find source and target endpoints for your transfer, then select directories or files to be transferred. The transfer itself is a background process.
To copy a file, several files, or an entire directory between two systems, navigate to the Globus App. Locate the source and target endpoints by their given names and follow these steps:
Authenticate yourself to both endpoints.
Select the Directory Listing panel for each Endpoint.
Pick a directory in each panel for your source and destination.
Click START to initiate the transfer.
Example
Navigate to globus.org.
Select “existing organizational login” NOAA RDHPCS. The File Manager page displays.
Select Collection, and choose the file system “noaardhpcs#mercury_untrusted”. If necessary, authenticate with username and RSA password.
In the File Manager, select Path: /collab1/data_untrusted/anonymous/from Orion
Repeat for the other endpoint: msuhpc2#Orion-dtn
Select files and directories, and click Start.
RDHPCS Globus Collection Summary
Globus Connect Service is available on the following RDHPCS and partner clusters.
Cluster |
Display Name |
File Systems |
Site |
Access |
|---|---|---|---|---|
PPAN |
noaardhpcs#ppan noaardhpcs#ppan_untrusted |
/archive, /home, /nbhome, /work, /xtmp /collab1/data_untrusted |
GFDL |
Trusted hosts Anywhere |
Ursa |
noaardhpcs#ursa noaardhpcs#ursa_untrusted |
/scratch3, /scratch4 /scratch3/data_untrusted, /scratch4/data_untrusted |
NESCC |
Trusted hosts Anywhere |
Gaea |
noaardhpcs#gaea
noaardhpcs#gaea_f6
|
/gpfs/f5, $HOME
/gpfs/f6, $HOME
|
NCRC |
Anywhere |
Mercury |
noaardhpcs#mercury noaardhpcs#mercury_untrusted |
/collab2/data
/collab2/data_untrusted
|
NESCC |
Trusted hosts Anywhere |
Orion |
msuhpc2#orion-dtn |
/work, /work2 |
Orion DTN at MSU |
Anywhere |
Hercules |
msuhpc2#hercules |
/work, /work2 |
Hercules DTN at MSU |
Anywhere |
NOAA RDHPCS Globus Endpoint Types
Note
It is preferable to use Trusted Endpoints for data transfer.
NOAA RDHPCS Globus Endpoints are either ‘’trusted’’ or ‘’untrusted’’.
All RDHPCS systems provide DTN’s
DTNs have full access to the back-end file systems.
DTNs only accept connections from pre-authorized sites. If your site can’t access the DTNs and you need that capability, submit a help desk ticket. If the security team approves, your site will be pre-authorized.
NOAA RDHPCS UDTN’s (Globus Untrusted Endpoint)
UDTNs can accept connections and transfer data to and from any location. UDTNs have access to a specific directory of the back-end file system, where files can be staged solely for the purpose of transferring data.
Since your project space is not accessible from the UTDN, transferring data to and from RDHPCS systems using the UDTN’s is a two-step process.
Copy the data out of your project space to the staging area and then pull data out of the UDTN from the remote machine.
To transfer data back to the RDHPCS system, push the data to the UDTN, then copy the file(s) from the staging area to your project space.
NOAA RDHPCS Object Stores in the Cloud
RDHPCS maintains Cloud Stores in Microsoft Azure, Amazon S3, and Google Cloud. From the Globus perspective, connecting to these types of resources is identical to any other endpoints serving DTNs.
The RDHPCS Globus plan offers connectors to access data to and from a public site available via AWS resources.
Navigate to globus.org.
Select “existing organizational login” NOAA RDHPCS. The File Manager page displays.
Select Collection, and search for NOAARDHPCS# collections.
Once you can see the file lists, you can use the “File Manager” to move the files between the desired endpoints.
Globus Command Line Interface (CLI)
Globus CLI is available on Ursa and Mercury. To load the “globus-cli” module, run the command:
$ module load globus-cli
The above module also defines environment variables for the UUIDs of some of the Globus endpoints that are commonly used by RDHPCS users. Please run the command:
$ module show globus-cli
to see the environment variables that are defined when you load the above module.
If you would like to use Globus-cli, either on your personal machine or on a system where globus-cli is not installed, you can install it easily . Instructions to install and use the Globus CLI are available in the Globus documentation CLI section.
Transferring Data to and from Your Computer
To transfer data from your laptop/workstation to a NOAA RDHPCS system, you can
Use Globus Connect Personal to transfer data between a NOAA RDHPCS UDTN and your local laptop/workstation.
Use
scpto a NOAA RDHPCS UDTN, using configured ssh port tunnels.Use
scpto a NOAA RDHPCS UDTN where permitted.
Note
NOAA RDHPCS considers your laptop/workstation a Globus Untrusted Endpoint.
Benefits of using Globus Connect Personal with UDTNs:
Data can be transferred directly between your computer and an Untrusted Endpoint.
Much faster transfer rates compared to
scpandsftp.Data transfers automatically suspend and resume as your computer goes to sleep, wakes up, or reboots.
The mechanism for transferring data between your laptop/workstation (Untrusted Endpoint) and a NOAA RDHPCS UDTN is exactly the same.
Please see Globus Connect Personal for information about setting up your laptop/workstation as a Globus Personal Endpoint.
Warning
Please note the following warnings when using the Globus Online transfers.
Globus transfers do not preserve file permissions. Arriving files will have (rw-r-r-) permissions, meaning arriving files will have user read and write permissions and group and world read permissions. Note that the arriving files will not have any execute permissions, so you will need to use chmod to reset execute permissions before running a Globus-transferred executable.
Globus will overwrite files at the destination with identically named source files. This is done without warning.
Globus has restriction of 8 active transfers across all the users. Each user has a limit of 3 active transfers, so it is required to transfer a lot of data on each transfer than less data across many transfers.
If a folder is constituted with mixed files including thousands of small files (less than 1MB each one), it would be better to tar the small files. Otherwise, if the files are larger, Globus will handle them.
Data Sharing with External Collaborators
Note
For a more complete discussion, see Transferring Data.
RDHPCS users can share data with external collaborators who do not have accounts on the RDHPCS system. You can share data files with external collaborators, both inbound and outbound, using the Untrusted DTNs (UDTNs). The process is described in this section.
For data that is short-lived, and not broadly shared with external users use RDHPCS end-points.
For data that is expected to be available for three 3 months or more, use the GFDL Institutional Data Portal end-point.
For data that is expected to be permanent (e.g., >3 months), use the GFDL institutional data portal end-point (noaagfdl#data_portal). This is for outbound sharing of data only. The data group will provide a Globus url to the data hosted upon completion of the data hosting.
Data hosted on the GFDL Data portal servers is accessible through Globus, and available on request through the data hosting request form for papers, collaborations, and other projects. The requester will be notified of the Globus URL when the request is completed. GFDL Data Transfer features can be reviewed in this table.
For assistance, contact the GFDL team at oar.gfdl.dpteam@noaa.gov.
Note
Refer to the GFDL FAIR use and GFDL Data DOI policy for external data sharing.
Note
This data sharing feature is only available only on untrusted Globus endpoints (UDTNs).
You must share the collection with your collaborators. THERE IS CURRENTLY NO PUBLIC SHARING AVAILABLE. You can share to an email address or a GlobusID.
You can only share directories under your
/*/data_untrusted/$USERdirectory.Before any sharing can be done, the user that is sharing the data must login to the system (Mercury, Ursa (WIP), Hera, …) at least once, to make sure that the account is properly set up the with the necessary home and project directories.
It may be necessary to create (
mkdir) your/*/data_untrusted/$USERdirectory, depending on the system.
Refer to the Globus Collection Summary to find the names of relevant Globus Collections, and the exposed directory names.
Globus Example
Globus is the preferred and most efficient and robust way to transfer data between Globus Collections and Endpoints (also known as DTNs) and external storage systems. To use this service, you must have an RDHPCS NOAA account and an RSA SecureID token. You can invoke Globus functions either through a web interface or from a command line interface (CLI). Click the link to access Globus Documentation.
The following is an example for the purpose of illustration, provided for people who need to get data moving from source to destination without delay.
What you need to have on hand
Your NOAA username (First.Last), and your RDHPCS MFA token.
The name and source of the destination endpoints, e.g., noaardhpcs#ppan_untrusted, noaardhpcs#ursa.
The file systems exposed to the endpoints (e.g.,
/collab1/data_untrusted,/scratch4/).
What you need to do
Navigate to the Globus Web App
Login with an existing organizational login, e.g., NOAA RDHPCS.
In the Globus File Manager’s Collection dialog, search for the destination endpoint (e.g., noaardhpcs#ppan_untrusted).
In the Path dialog, select the endpoint’s file system path (e.g.,
/collab1/data_untrusted/First.Last).Repeat steps 3 and 4 for the second endpoint.
Select the files/directory to transfer.
Click the Start button.
Using Globus Online Data Transfer
An endpoint is a file transfer location (computer/server) accessible to Globus. A collection is a server with a related access method to files. Untrusted collections can transfer data to and from anywhere. Trusted collections can transfer data to and from other trusted collections. When you log into Globus and click Collections, you can see what collections are shared with you, and also those that you share with others. Globus lets you navigate through collections to find source and target endpoints for your transfer, then select directories or files to be transferred. The transfer itself is a background process.
To copy a file, several files, or an entire directory between two systems, navigate to Globus. Locate the source and target endpoints by their given names and follow these steps:
Authenticate yourself to both endpoints.
Select the Directory Listing panel for each Endpoint.
Pick a directory in each panel for your source and destination.
Click START to initiate the transfer.
Globus Connect Service is available on the following RDHPCS and partner clusters:
RDHPCS clusters with GCS
Cluster |
Endpoint Name |
File System(s) |
RDHPCS Site |
Host Access |
|---|---|---|---|---|
Ursa |
noaardhpcs#ursa |
/scratch3 /scratch4 |
NESCC |
Trusted hosts |
Mercury |
noaardhpcs#mercury |
/collab1/data |
NESCC |
Trusted hosts |
Mercury |
noaardhpcs#mercury_untrusted |
/collab1/data_untrusted |
NESCC |
Anywhere |
PPAN |
noaardhpcs#ppan_rdtn |
/archive /home /nbhome /work /ptmp |
GFDL |
Trusted hosts |
PPAN |
noaardhpcs#ppan_untrusted |
/collab1/data_untrusted |
GFDL |
Anywhere |
Gaea |
noaardhpcs#gaea |
/gpfs/f5 /gpfs/f6 |
NCRC |
Anywhere |
Orion |
msuhpc2#Orion-dtn |
/work /work2 |
MSU HPC2 |
Anywhere |
Orion |
msuhpc2#Hercules |
/work /work2 |
MSU HPC2 |
Anywhere |
GFDL Data Portal |
noaagfdl#data portal |
/data |
GFDL |
Anywhere |
RDHPCS Object Stores in the Cloud
Endpoint/Collection |
Description |
|---|---|
noaardhpcs#cloud_aws_rdhpcs_projects |
AWS Cloud RDHPCS endpoint |
noaardhpcs#cloud_azure_rdhpcs_projects |
Azure Cloud RDHPCS endpoint |
noaardhpcs#cloud_gcp_rdhpcs_projects |
Google Cloud RDHPCS endpoint |
External S3 Bucket Connectors
Endpoint/Collection |
Description |
|---|---|
noaardhpcs#cloud_aws_s3_public |
Public AWS S3 connector |
noaardhpcs#cloud_aws_s3_authenticated |
Non-public managed AWS S3 connector |
noaardhpcs#cloud_aws_s3_authenticated2 |
Non-public managed AWS S3 connector |
NOAA RDHPCS Globus Endpoint Types
NOAA RDHPCS Globus Endpoints are either trusted or untrusted.
All RDHPCS systems provide DTN’s
DTNs have full access to the back-end file systems.
DTNs only accept connections from pre-authorized sites. If your site can’t access the DTNs and you need that capability, submit a help desk ticket. If the security team approves, your site will be pre-authorized.
Note
It is preferable to use trusted endpoints for data transfer whenever possible.
NOAA RDHPCS UDTN’s (Globus Untrusted Endpoint)
UDTNs can accept connections and transfer data to and from any location. UDTNs have access to a specific directory of the back-end file system, where files can be staged solely for the purpose of transferring data. Since your project space is not accessible from the UTDN, transferring data to and from RDHPCS systems using the UDTN’s is a two-step process.
Copy the data out of your project space to the staging area and then pull data out of the UDTN from the remote machine.
To transfer data back to the RDHPCS system, push the data to the UDTN, then copy the file(s) from the staging area to your project space.
NOAA RDHPCS Object Stores in the Cloud
RDHPCS maintains Cloud Stores in Microsoft Azure, Amazon S3, and Google Cloud. From the Globus perspective, connecting to these types of resources is identical to any other endpoints serving DTNs. The RDHPCS Globus plan offers connectors to access data to and from a public site available via AWS resources.
Accessing Cloud Endpoints in our environment
The RDHPCS Globus plan offers connectors so you can access data to from a public site that makes it available via AWS resources. To use this service you must login to Globus with your NOAA RDHPCS credentials.
Publicly accessible buckets, no keys required
As an example, let us consider the case where user needs to get files from the NOAA RRFS experiment from the AWS Cloud.
Go to https://registry.opendata.aws/.
In the “Search datasets” field enter the data set of interest, in this case: noaa-rrfs (the first part of the URL of interest) Click on the results listed in the right pane of the window: This will lead to: https://registry.opendata.aws/noaa-rrfs/.
From that web page, copy the last part of the ARN (in this example noaa-rrfs-pds): arn:aws:s3:::noaa-rrfs-pds Now you have the info you need.
Login to <https://www.globus.org/> with your NOAA identity.
In the File Manager window
Enter into the “Collection” field: noaardhpcs#cloud_aws_s3_public
Enter into the “Path” field: /noaa-rrfs-pds/rrfs_a/rrfs_a.20230725/00/control/
Once you are able to see the listing of files you can use the “File Manager” to move the files between the desired endpoints.
Note
Module globus-cli needs to be loaded before any globus commands are used.
For Globus CLI use, the endpoint UUID is given by:
$ globus endpoint search noaardhpcs#cloud_aws_s3_public
You may save the UUID in an environment variable you create, e.g.: RDHPCS_AWS_PUBLIC. From here on, normal Globus CLI methods will work.
For example, to get a directory listing, type
$ globus ls -l $RDHPCS_AWS_PUBIC\:/noaa-rrfs-pds/
Navigate to globus.org.
Select the “existing organizational login” NOAA RDHPCS. The File Manager page displays.
Select Collection, and search for NOAARDHPCS# collections.
Once you can see the file lists, you can use the “File Manager” to move the files between the desired endpoints.
Non-public, secret keys required
There are non-public sites, curated by the owners. To access the sites, owners must provide you with two things:
AWS IAM Access Key ID
AWS IAM Secret Key
To gain access, you must use a specific endpoint name available through the RDHPCS subscription.
In the File Manager search for and select noaardhpcs#cloud_aws_s3_authenticated1 or noaardhpcs#cloud_aws_s3_authenticated2
Note
There are endpoints provided to facilitate transfers from one cloud bucket to another in case it is needed.
Click on the three vertical dots to the right of the Collection field
Select the Credentials tab.
If the STATUS column shows invalid, click the wrench icon. Enter the Access Key ID and Secret key, and hit Continue, and you have access to the contents of the S3 bucket.
Warning
Because the access/secret key combination is specific to only one collection, you can only be connected to at most one bucket at a time.
Change buckets
If you need to access a different bucket with this mechanism, you must delete your working AWS Access Credentials first, so you create a different one linked to the new bucket. As above, when you select the Credentials tab, you will see the STATUS as active. To remove these credentials, so you can create a new association with the new access key/secret, click on the trash can icon.
Globus Command Line Interface (CLI)
The CLI is available on Ursa (WIP) and Mercury. If you would like to use Globus-cli, either on your personal machine or on a system where globus-cli is not installed, you can install it easily. Refer to the instructions to install and use the Globus CLI.
Transferring Data to and from Your Computer
To transfer data from your laptop/workstation to a NOAA RDHPCS system, you can
use scp to a NOAA RDHPCS DTN (using pre-configured SSH port tunnels.
use scp to a NOAA RDHPCS UDTN
use Globus Connect Personal to transfer data between a NOAA RDHPCS UDTN and your local laptop/workstation.
NOAA RDHPCS considers your laptop/workstation as a Globus Untrusted Endpoint.
Some benefits of using Globus Connect Personal with UDTNs:
Data can be transferred directly between your computer and an Untrusted Endpoint.
Faster transfer rates as compared to scp and sftp.
Data transfers automatically suspends and resumes as your computer goes to sleep, wakes up, or reboots.
The mechanism for transferring data between your laptop/workstation (Untrusted Endpoint) and a NOAA RDHPCS UDTN is exactly the same. See Globus Connect Personal for information about setting up your laptop/workstation as a Globus Personal Endpoint.
GFDL Institutional Data Portal
Data hosted on the GFDL Data portal servers is accessible through Globus, and available on request through the data hosting request form for papers, collaborations, and other projects. The requester will be notified of the Globus URL when the request is completed. GFDL Data Transfer features can be reviewed in this table.
Note
Information shared through the GFDL portal is shared permanently.
Migrating Data Between Local File Systems
Note
Large scale data migration can be challenging and time consuming. Please review the following guidelines and tools to minimize the time it takes to move your data and ensure successful and complete migration
General Guidelines
Size the dataset and prune unneeded data. Use tools such as
du,treeon the directories to understand the data volumes. Ensure there are no duplicate data sets, temporary working files, or other unneeded content. The most efficient way to move data is to reduce the data to move. Usetarorziparchiving tools to collapse directories into a single file. As appropriate, archive directories to the site-specific HSMS and delete from scratch file systems.Start early and leave plenty of time for migration. Be aware that everyone on the filesystems will be moving data. Even with data sizes in hand, with limited insight into the data structure of individual directories, it is hard to predict exactly how long a transfer might take. Be sure to plan far ahead and leave yourself plenty of time to complete a migration! Note that transferring many small files is often worse than a few large files because performance is more strongly related to the time it takes to access a file, not transfer it.
Make sure that the user performing the copy has permissions to read all data in the directory to be transferred. If a directory has files or sub-directories which are restricted, you will need to split it up into multiple transfers as multiple users, or change ownership on the source data first.
Disable all batch and cron jobs that may be modifying the directories to be transferred! Any create/modify/delete changes can result in errors for any data transfer tool. For transfer of a large directory it may be OK to perform an initial copy interactively, but definitely quiesce access before performing a final sync.
Use a synchronization tool (NOT just
cpormv) and don’t rely on a one-time transfer completing perfectly. This is important because you will most likely have to run the process more than once, and tools such as rsync will skip already copied files. Then go back and delete the source data once you have confirmed the copy is complete.For small data volumes, use an interactive session on an HPCS head node. In the unlikely event the volume of data to move is less than a terabyte (TB) / 1,000 gigabytes (GB) it is appropriate to use a head node to do an ‘ad-hoc’ data transfer using a tool such as rsync.
For larger data volumes, submit a batch job to a ‘dtn’ or similar queue
Suggested Tools
du
An original part of Unix, the du disk usage tool will be found on
every HPCS. It can provide a simple overview of the usage of a file
or directory. Output can be easily sorted by piping the output
through sort. One example command is:
du -sk DIRECTORY/* | sort -n
-swill summarize sub directory usage-kwill output in 1024-byte (1 kiB) blocks| sort -npipes the output through the sort, sorted numerically
tree
A highly useful but optional part of Linux systems that should be
installed on all NOAA RDHPCS, the tree tool provides
tree-structured output about a directory with the option to summarize
and calculate usage. One example command is:
tree --du -h -d -L 2 --sort=size DIRECTORY
--duwill calculate disk usage on directories-hwill display human-readable (K,M,G,T) volumes-dwill summarize directories-L 2will only show two levels of directories--sort=sizewill sort output by size
% tree --du -h -d --sort=size -L 2 .
[8.8K]  .
├── [6.3K]  source
│   ├── [2.6K]  images
│   ├── [ 416]  data
│   ├── [ 416]  systems
│   ├── [ 288]  software
│   ├── [ 224]  slurm
│   ├── [ 192]  _templates
│   ├── [ 192]  accounts
│   ├── [ 160]  _downloads
│   ├── [ 160]  files
│   ├── [ 128]  _search
│   ├── [ 128]  _static
│   ├── [ 128]  contributing
│   ├── [ 128]  help
│   ├── [ 128]  logging_in
│   ├── [  96]  FAQ
│   ├── [  96]  compilers
│   ├── [  96]  connecting
│   └── [  96]  queue_policy
├── [1.7K]  build
│   ├── [ 992]  html
│   └── [ 608]  doctrees
└── [  96]  utils

  15K used in 24 directories
Local Data Migration note and table
Attention
Do not use the du or tree command on the lustre filesystems listed below:
Cluster |
File System |
|---|---|
Ursa
|
/scratch3
/scratch4
|
rsync
For basic migration, it is recommended to use the rsync tool to
transfer the files and directories. One example command is:
rsync --archive --verbose --one-file-system /full/path/to/source/directory/ /full/path/to/destination/directory
Warning
It is very important that you have a trailing slash after the
source directory: /full/path/to/source/directory/ /. If you do not,
a second invocation of the same command will attempt to retransfer all of
the data into a subdirectory, for example:
/full/path/to/source/directory/directory.
--archive(-a) will ensure all ownership and dates are preserved in the transfer.--verbose(-v) will display details of every file being transferred. If you have lots of small files, this will slow down the transfer processes.--one-file-system(-x) restricts the transfer to the source filesystem. This is important when symlinks are used to point to data that exists on other filesystems.
To keep the two directories exactly the same, use --delete – if
the file did not exist in source, you want it removed on
destination if does exist:
--deletemeans to remove files from the destination that are not in the source directory. If after a completed rsync a file was then removed from the source, then the next rsync with the--deleteoption would then remove the file from the destination/ It may be preferable to clean up the source only after confirming that all the files have been transferred.
Warning
Do not use the --delete option if you do not want data in the
destination directory to be removed.
A sample batch script to transfer data
Here is a sample batch script that can be used as a template, then submitted to the batch system to perform the data movement:
#!/bin/bash

#SBATCH --job-name=data-transfer
#SBATCH --partition=PARTITION_GOES_HERE
#SBATCH --time=08:00:00
#SBATCH --nodes=1
#SBATCH --output=$HOME/data-transfer-job-%j

set -x

SRC=/path/to/source/directory/                 # Note trailing slash
DEST=/path/to/destination/directory

echo "$(date) : Starting sync from $SRC to $DEST"

rsync -ax $SRC $DEST

echo "$(date) : Ending sync from $SRC to $DEST"
Before using this template, replace the PARTITION_GOES_HERE with
the appropriate partition for the HPCS being used. Refer to the
system-specific pages for that information.
After updating the template and saving it locally as a batch job,
submit it to the batch system. Watch for the exit status – if it does
not finish in 8 hours, resubmit it. Once it finishes successfully, add
-v to the rsync line and submit it one more time. Examine the
output file carefully to make sure there are no errors.
If after several tries, the transfer still hasn’t completed, and the errors are not obvious upon reading the batch job output, refer to the getting help pages and ask for assistance. Be sure and include the file paths of the output files of your transfer jobs for best assistance.
Known Issues
My job runs to completion but the files are not transferred
Look at the job output for obvious errors. It will be in your home
directory in a file starting with data-transfer-job-. If your job
completes and the files appear to not to have transferred, read that
file for clues.
If you are not a regular user of the batch system, it is likely that
your initialization files are printing messages (typically with
echo command in the initialization files) that are causing the
jobs to fail.
If this happens you could rename your initialization files (.cshrc, .tcshrc, .bashrc, .login, .profile, .bash_profile, etc) temporarily and try again. A better solution is to address the problems caused by these initialization files.
Were all my files transferred?
Look at the job output. It will be in your home directory in a file
starting with data-transfer-job-. When the job completes read
that file for clues and any errors. You can ignore WARNings, and
other messages, but any message with the string “FATAL” suggests an
incomplete transfer. It can happen because you ran out of time, or
there may be other problems. If your job exited because it ran out of
time you should be able to resubmit the job but be sure to add the
–resume option.