Gitlab Server
NOAA RDHPCS provides a secure Git server (URL: https://git.rdhpcs.noaa.gov) and a container registry (URL: https://registry.rdhpcs.noaa.gov) based on a self-hosted Gitlab instance that is accessible only within the NOAA network. The Gitlab instance supports CI/CD pipelines that can run with self-hosted Gitlab Runners installed on RDHPCS systems.
Attention
Users need to use tunnels to access the NOAA RDHPCS Git server and the container registry from external machines such as personal laptops.
Web Access
The Gitlab instance is accessed through the web to set up accounts, create new projects, and configure settings for password-less login for git and container registry. To access the Gitlab web interface from a personal machine, first a tunnel has to be created followed by proxy setup on your web browser.
Tunnel Setup
Set up a tunnel to any RDHPCS machine:
ssh -D <port-no> User.Name@bastion.<princeton/fairmont>.rdhpcs.noaa.gov
Configure browser proxy settings. Check your browser documentation on how to modify the proxy settings. In the example below, Mozilla Firefox with a tunneling port number
9999is used.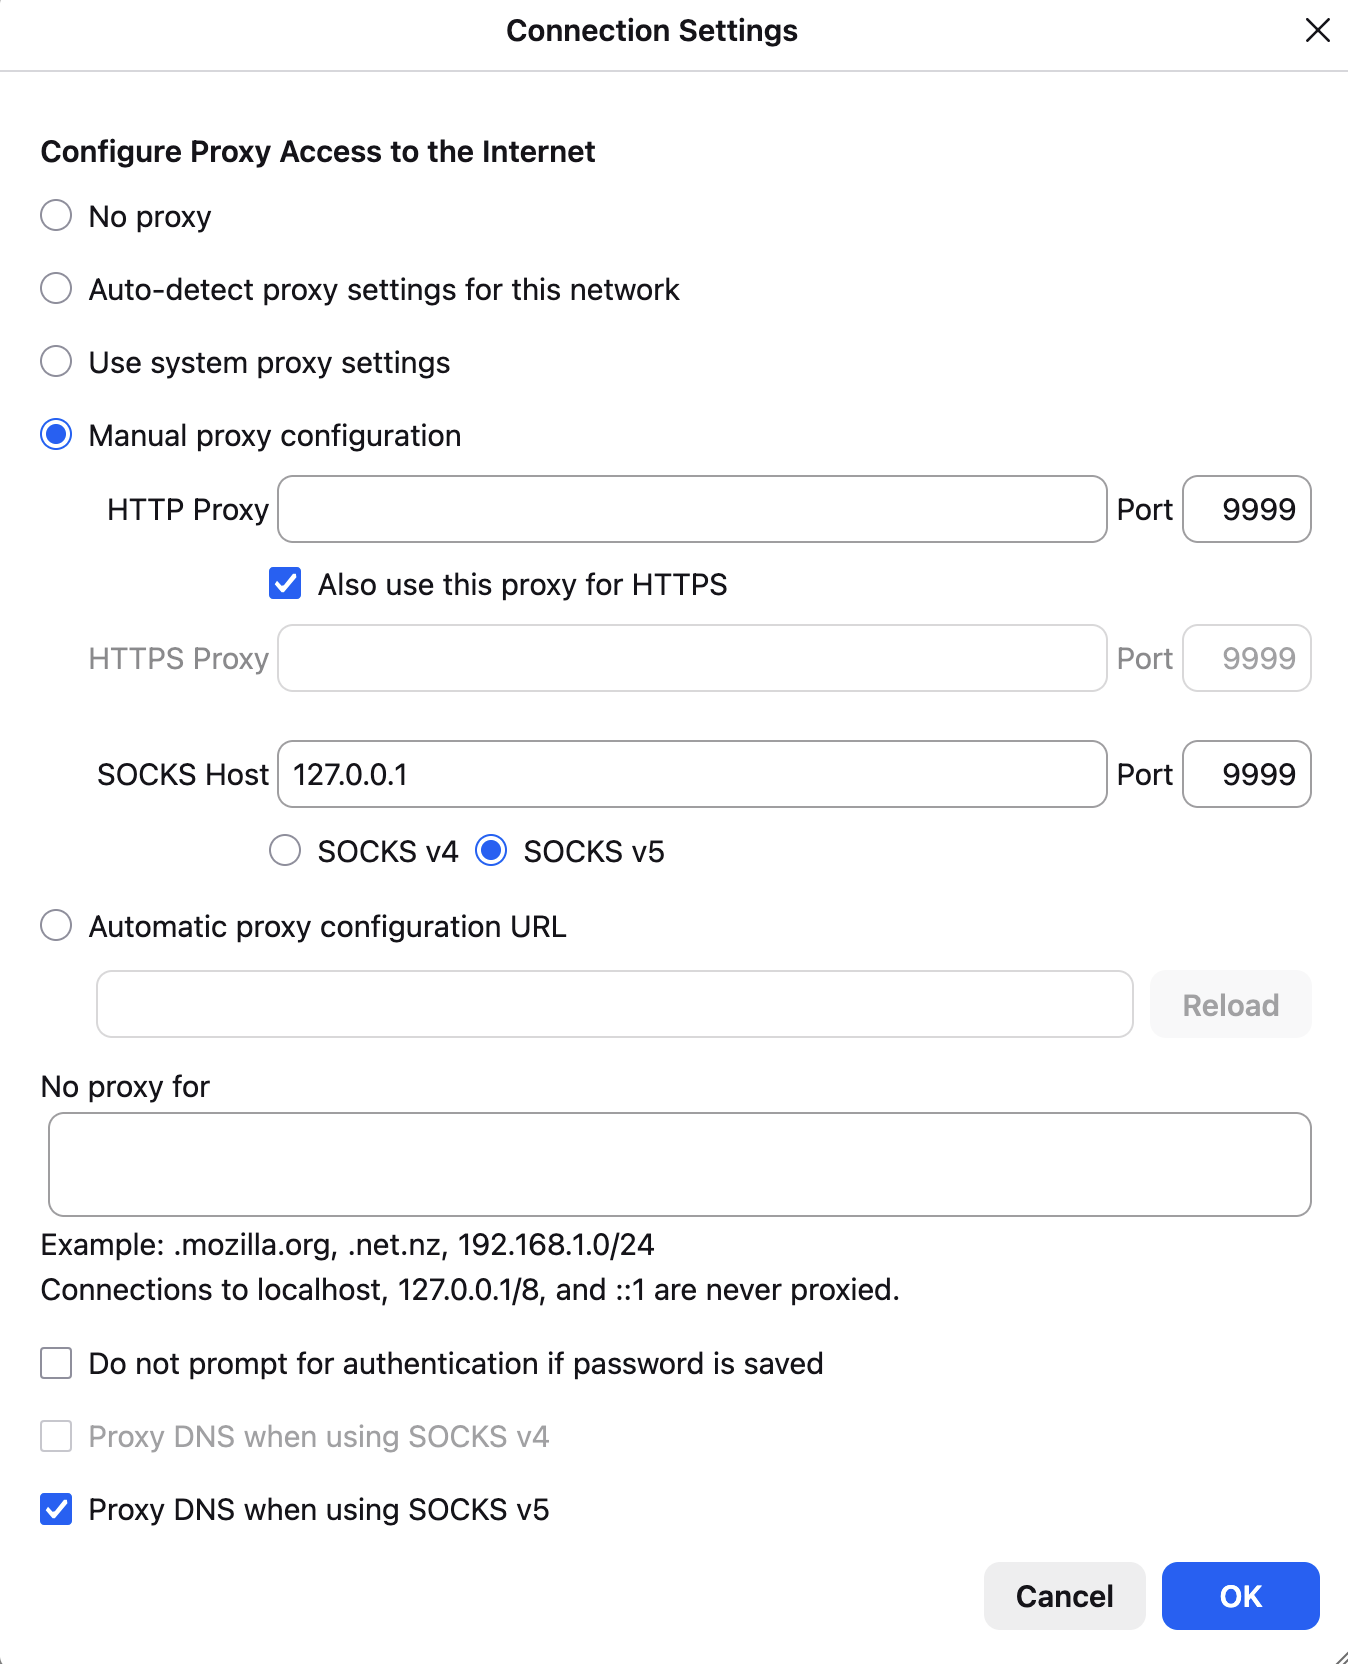
Open
https://git.rdhpcs.noaa.govin the browser. You should see the Git server with NOAA sigon button. Sign in with your NOAA credentials and complete MFA using your YubiKey.
Configure User Authentication for Command Line
Private and internal projects hosted on the Gitlab require user authentication when accessing the git repositories or container images. The Gitlab instance does not support the Yubikey based authentication from the command line. Instead, users are expected to setup either SSH keys or a Personal Access Token (PAT).
SSH Keys
SSH keys come in pairs and consist of a public and private key. Users typically create them on the machine (client) from which the Gitlab server is accessed. Each client machine requires its own set of SSH keys. The RDHPCS systems such as Ursa and Hera have pregenerated SSH keys. Users have to upload the public SSH key to the Gitlab server. See Use SSH keys with Gitlab for detailed instructions.
Personal Access Token (PAT)
PAT is useful to access the Gitlab API, container registry and for https based git access. A PAT has to be created on the Gitlab server.
Click the user icon in the top-right corner and select Edit Profile.
In the left pane, click Personal Access Tokens.
Click Add new token.
Save the token in a secure location.
For detailed instructions on PAT, refer to the PAT documentation.
Warning
PAT can only be accessed once after creation. Store it promptly.
Gitlab Project
A git repository is designated as a Project on Gitlab server. Container images stored in the container registry are associated with a Gitlab project. If users want to upload a container image or create a new git repository, a Gitlab project has to be created. When creating a new project, the user may be asked whether to use the user name or a group name as the namespace. Unless the project belongs to a group, use the user name.
A Gitlab project has three visibility levels: private, internal, and public. A private project can only be accessed by the owners of the project who could be a single user or a group owining the project. If a repository or container images need to be shared to the RDHPCS users, the associated project needs to have either internal or public visibility. Because Gitlab server is accessible only from RDHPCS network, internal and public visibility levels serve similar purpose except accessing public projects do not require authentication to the Gitlab server. If the intent is to make a project accessible to all the NOAA users, it is recommended to use public visibility for a project instead of internal visibility.
Git Usage
Git access is typically through a git client, (either git or glab commands on CLI or an IDE such as VSCode) on the RDHPCS system. The URL for the git repo on the git server is dependent on whether ssh or https protocol is used. User id and PAT have to be supplied if https protocol is used. SSH protocol enables password-less connection through SSH keys. To learn more about git, refer to git documentation.
GitLab CLI (glab)
GitLab CLI tool named glab is installed on the RDHPCS systems. On Gaea, users have to load the glab module by running the below commands.
module use /ncrc/usw/rdhpcs/modulefiles
module load glab
On MSU systems, Orion, and Hercules, run the module load glab command to
load the glab package.
Using glab, users can perform actions such as repository creation on the Git server, cloning the repository, etc. The first step in using the GitLab CLI is authenticating the GitLab server.
glab auth login --hostname https://git.rdhpcs.noaa.gov --token <YOUR_PAT_TOKEN>
By default glab command defaults to https://gitlab.com. To use the RDHPCS git server, set the environment variable GITLAB_HOST.
export GITLAB_HOST=https://git.rdhpcs.noaa.gov
To make it permanent add the above line to your ~/.bashrc file and then
source the file or log in again. Users can add the SSH keys from the command
line as shown below.
glab ssh-key add ~/.ssh/id_rsa.pub -t "<rdhpcs_machine_name>" --usage-type "auth"
Glab can be used to create a repo under user account.
glab repo create <project-name>
To create the same repo under a group, run the below command.
glab repo create <group-name>/<project-name>
All the repos owned by the user in the Git server can be listed by running the below command.
glab repo list
A repo can be cloned using glab. Users can supply the full URL or they can
supply the path shown in the glab repo list command. The path is usually
<account-name or group-name>/<project-name>.
glab repo clone <path-to-repo>
For additional information on the GitLab CLI, refer to the glab documentation.
Similar to glab, GitHub CLI tool (gh) is also available on the RDHPCS
systems. Whereever glab module has to be loaded, gh module has to be
loaded to use gh. Refer to the
gh documentation for additional information.
GitLab CI/CD Pipelines
GitLab CI/CD pipelines automate the process of building, testing, validating,
and deploying application code whenever changes are pushed to a git repository.
A pipeline is defined in a file named .gitlab-ci.yml at the root of the
git repository. This file contains stages, jobs, scripts, variables, and rules
that control how the automation runs.
A typical pipeline is organized into stages such as build, test, and
deploy. Each stage can contain one or more jobs. Jobs in the same stage can
run in parallel, while stages usually run in order. For example, the test stage
runs only after the build stage completes successfully, and the deploy stage
runs only after the test stage passes.
Pipelines help teams maintain consistent delivery practices by reducing manual steps, catching errors early, and ensuring that code is validated before it reaches production or another target environment.
Example .gitlab-ci.yml Pipeline
The following example shows a simple pipeline with three stages: build, test, and deploy.
stages:
  - build
  - test
  - deploy

build_job:
  stage: build
  script:
    - echo "Building the application..."
    - mkdir -p build
    - echo "Build output" > build/output.txt
  artifacts:
    paths:
      - build/

test_job:
  stage: test
  script:
    - echo "Running tests..."
    - test -f build/output.txt
    - echo "Tests completed successfully."

deploy_job:
  stage: deploy
  script:
    - echo "Deploying the application..."
    - echo "Deployment completed."
  only:
    - main
In this example:
stagesdefines the order of execution.build_jobcreates a build artifact.test_jobchecks that the build output exists.deploy_jobruns only when changes are pushed to themainbranch.artifactsallows files created in one job to be passed to later stages.
This type of pipeline can be expanded to include application compilation, unit tests, code quality checks, security scans, container image builds, and deployment to development, staging, or production environments.
GitLab Runners
A GitLab Runner is an agent that executes the jobs defined in a GitLab CI/CD pipeline. When a pipeline starts, GitLab assigns each job to an available runner. The runner checks out the repository, executes the job script, collects artifacts, and sends the job result back to GitLab.
Runners can be installed on RDHPCS systems such as Hera and Ursa. Users are advised to set up two executor types, either shell, or a custum slurm executor from https://github.com/Algebraic-Programming/slurm-gitlab-executor. The executor determines the environment in which pipeline jobs run.
The shell executor runs CI/CD job commands directly on the login node using
the user configured shell, such as Bash. This executor is simple to configure
and useful when pipelines are run occassionally. Shell executor provides direct
access to tools, scripts, directories, compilers, or system-level utilities
already installed on the RDHPCS cluster.
However, because shell executor jobs run directly on the login node, they should be used sparingly so as to not overwhelm the login nodes.
Installing GitLab Runner on RDHPCS systems
Gitlab Runners can be installed at user scope on RDHPCS systems. The following example shows a common installation flow targeting an RDHPCS cluster.
# Create a folder in /scratch3 or /scratch4 under appropriate project directory or
# in your home directory
mkdir -p <target_folder>/bin

# Add the folder to the PATH environment variable. For permanency between logins
# add the below line to your shell configuration file if your shell is bash or zsh
export PATH=$PATH:<target_folder>/bin

# For C-style shells use
setenv PATH $PATH:<target_folder>/bin

# Download the GitLab Runner binary
curl -L --output <target_folder>/bin/gitlab-runner "https://s3.dualstack.us-east-1.amazonaws.com/gitlab-runner-downloads/latest/binaries/gitlab-runner-linux-amd64"

# Give Permissions to execute GitLab Runner
chmod +x <target_folder>/bin/gitlab-runner
Register a Gitlab Runner with Shell Executor
Before registering the runner, create or obtain a runner authentication token from GitLab.
In GitLab, go to the project or group where the runner should be registered:
Project-level runner:
Project>Settings>CI/CD>RunnersGroup-level runner:
Group>Settings>CI/CD>Runners
Then register the runner on the server.
gitlab-runner register
During registration, provide the requested values.
Enter the GitLab instance URL:
https://git.rdhpcs.noaa.gov

Enter the runner authentication token:
<runner-token-from-gitlab>

Enter a description for the runner:
shell-runner-server

Enter tags for the runner:
ursa or hera to specify machine or some other tag

Enter an executor:
shell
After registration, the runner configuration is stored in:
$HOME/.gitlab-runner/config.toml
A shell executor runner configuration may look similar to this:
[[runners]]
  name = "shell-runner-server"
  url = "https://git.rdhpcs.noaa.gov"
  token = "RUNNER_TOKEN"
  executor = "shell"
  [runners.cache]
    MaxUploadedArchiveSize = 0
Users can register multiple runners with different tags and names.
Gitlab Runner Execution
After registration, the runner can only be run in the user mode.
gitlab-runner run
To check runner status from GitLab, return to the project or group runner settings page. The runner should appear as available or online.
Shell Executor Best Practices
When using the shell executor, follow these practices:
Use shell runners only for projects that do not get developed actively.
Try to avoid running untrusted code.
Use runner tags to control which jobs can use the runner.
Clean temporary files and workspace data.
Store sensitive values as GitLab CI/CD variables instead of hardcoding them in scripts.
Custom Slurm Executor
The shell executor can overwhelm the login nodes for high velocty projects.
For such cases, service partition can be used to run CI/CD pipelines. Users
have to install a
custom slurm executor
and update the gitlab runner to use the slurm executor. Users can refer to the
instructions
to set up the slurm executor. In the end update the final runner configuration
to point builds_dir and cache_dir variables to directories in either
/scratch3 or /scratch4.
[[runners]]
   executor = "custom"
   ...
   builds_dir = "/scratch[3,4]/path/builds"
   cache_dir = "/scratch[3,4]/path/cache"
Slurm variables have to be specified in the .gitlab-ci.yml file to generate
an appropriate sbatch script that can be launched by the slurm executor. Slurm
variables shown below are appropriate for the u1-service partition on Ursa
cluster.
variables:
   CI_SLURM_ACCOUNT:
     value: "your_noaa_project"
     description: "Slurm account to use"
   CI_SLURM_PARTITION:
     value: "u1-service"
     description: "Slurm partition to use"
     options: ["u1-service"]
   CI_SLURM_MEM_PER_NODE:
     value: "100G"
     description: "Maximum memory allowed on u1-service is 250G"
   CI_SLURM_NNODES:
     value: "1"
     description: "Number of nodes"
   CI_SLURM_NTASKS:
     value: "1"
     description: "Number of tasks"
   CI_SLURM_CPUS_PER_TASK:
     value: "8"
     description: "Maximum number cores allowed is 63"
   CI_SLURM_QOS:
     value: "batch"
   CI_SLURM_TIMELIMIT:
     value: "00-08:00:00" # 0 days, 8 hour, 0 minutes, 0 seconds
     description: "Max time limit of batch qos is 8 hours (format: days-hours:minutes:seconds)"
   RUNNER_SCRIPT_TIMEOUT: 8h
Container Registry
The container registry is accessible at https://registry.rdhpcs.noaa.gov.
Configuration on RDHPCS system
By default, Apptainer uses the home directory for cache storage. On multi-user RDHPCS systems, home directories are often too small, so use a scratch location instead:
export APPTAINER_CACHEDIR=/scratch[3-5]/<project-path>/User.Name/apptainer_cache_dir
You can also place this command in ~/.bashrc and then source the
file or log in again.
Note
Choose one of /scratch3 through /scratch5.
/scratch3 and /scratch4 are available on both Hera and Ursa.
/scratch5 is available only on Ursa.
Registry Login
A container image hosted on a registry can be either publicly accessible or accessible only after authentication on the registry. For pushing images, authentication is mandatory. To authenticate to the registry, first ensure you have account on the Gitlab server. Then authenticate to the registry using apptainer.
apptainer registry login -u user.name oras://registry.rdhpcs.noaa.gov
Enter your PAT when prompted.
Image pull and push
Image Pull
Example using alpine linux docker image from DockerHub:
apptainer pull docker://alpine:latest
For docker images
docker://prefix is needed. If the image name does not to supply any registry URL, DockerHub registry is used. Running the above command createsalpine_latest.sifin the working directory.Assuming an alpine linux SIF image is stored on the RDHPCS registry,
apptainer pull \
  oras://registry.rdhpcs.noaa.gov/user.name/user_project/alpine:latest
In the above command,
user.name/user_projectrepresents the project under which the image is stored. Since the image is in SIF format,oras://prefix is needed.A custom local image name can also be used as shown below.
apptainer pull my_image.sif \
  docker://registry.rdhpcs.noaa.gov/group/project/<image>:<tag>
When the above command is executed, instead of
image_tag.sif,my_image.sifis created in the working directory.
Push Image to the RDHPCS container registry
apptainer push alpine_latest.sif \
  oras://registry.rdhpcs.noaa.gov/user.name/project/alpine:latest
This assumes user.name/project already exists on the Gitlab server.
At a more advanced level, CI/CD pipelines are used to build and push the
containers to the registry as part of the software release cycle.